Pages

Thursday, July 26, 2012

Tutorial: Tribal Print Denim Shorts

Have you seen these denim cutoffs with tribal print panels added? They're all over Pinterest.

Free People


Free People Rodeo Shorts

Cute right!? Some have a panel in the front and also a contrasting strip on the back yoke. My sister asked me to make a pair for her out of some cast off jeans so I thought I'd take some photos and share. It was a pretty quick project, here's how: 

You Need: 
Shorts (hemmed or frayed)
small pieces of fabric (cotton, knit, poly, etc... just be sure that it can take a little heat)
small pieces of Pellon "Wonder Web" (this is great stuff, it's over by the interfacing)
matching thread, scissors, iron, denim needle, stitch ripper, etc...

The Steps: 
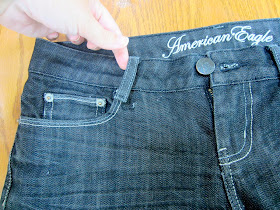
1) Start by using a stitch ripper to remove stitches from the bottom of the belt loops (I did all of them so that I could sew them back on with black thread instead of taupe, just a time saver :)


2) Use the wonder web to create a template for each of the fabric pieces. Cut them so that they fit perfectly within the area you want to cover with fabric. We will add some allowance for hems in the next step. (You can see here I started with two separate pieces in the back but that really wasn't necessary)


3) Lay the wonder web on your fabric of choice; using it as a template, cut around the pieces adding a 1/4 " hem allowance on all sides. 


4) Head to the ironing board and pin wonder web to the wrong side of the newly cut pattern pieces. Snip corners off diagonally to reduce bulk then begin folding the fabric around the wonder web and pressing it down with a hot iron. (See photos) Avoid touching the web with your iron or you'll have a sticky mess. 


Snip wherever necessary to manipulate the fabric around the "wonder web template." The center bottom of the yoke (below) needs a snip to keep the correct angle and make a row of snips around the curve of the pocket for the front panel. 


5) When you're finished pressing, pin the pieces to the shorts. Use lots of pins and be prepared to pull and tuck so that the pieces fit correctly. (WAIT UNTIL AFTER SEWING TO PRESS, that gives you the chance to shift the fabric around and avoid weird wrinkles.)


6) Sewing with matching thread, stitch as close to the edge of the fabric as possible, smoothing as you go and keeping the belt loops out of the way.


 When you apply the front panel, finagle your way inside the pocket so that you don't stitch it closed, then sew around the outside edges.


7) After you finish stitching, press the shorts, heating wonder web and fusing the fabric even more securely to the shorts.


8) Last step! Sew the belt loops back in place. Done! A trendy, easy, upcycle!


As soon as I get one, I'll add a picture of my sis modeling these! I would have tried them on myself...but...the effect (considering my 7 month pregnant belly) wouldn't have been exactly the same :).

By the way, this fabric is a $1/yd remnant from Hancocks. It feels like rayon but is probably some other kind of cotton/poly blend because it ironed just fine. I think the light weight helped keep these shorts from feeling too bulky. 

Friday, July 20, 2012

"Tie-in'-It-Up" Tee

Back in April a good college friend, whom I don't get to see nearly often enough :), emailed and asked me to make a t-shirt with an appliqué tie on the front for her little man's first birthday party. I have seen these everywhere...bibs with ties, tee's and onesies with ties, you name it...but I've never made one myself. So I was excited to do it. I found an inexpensive 18-24 month tee at Old Navy, it had a chest pocket but I removed that before pre-washing and drying. You can't even see where it was.

This is a quick and easy project!

Here's what you need: 
Tee, onesie, bib, etc...
small piece of cotton fabric (woven or knit is fine, just make sure it's washable)
lightweight and medium weight fusible interfacing
chalk or disappearing ink pen
pins, thread, sewing machine, scissors


1) First decide on the size and shape of your tie. This is personal preference. Fatter and shorter makes it look more "cartoonish," my friend specifically requested a more narrow, realistic tie. Practice on tissue paper until you get what you want, keep it proportional to the garment you are working with. Also, be sure that when you cut it out, that the left and right sides are symmetrical.

2) Back the tie with lightweight fusible interfacing and press a strip of medium weight inside the shirt. Position the tie and pin securely. Set your machine to a dense, wide zig-zag stitch (I used 0.8 density and between 2.8 and 3.0 width) and turn the thread tension down a bit (I used 3). See my "Tips and Tricks to Applique." Careful not to stretch the tee as you sew, sew the tie to the shirt.


3) Peel away and trim off as much of the medium weight interfacing as possible from the inside of the shirt (I find it makes the shirt feel a bit stiff if left on). Press with a little steam if you have any funny wrinkles. That's it! Enjoy!


Even better when it's adorning an adorable chunk of baby boy! Happy birthday little guy!


Thursday, July 19, 2012

Tutorial: Simple Button Placket


This week I’ve been drafting a pattern for a new outfit for P. I’m really excited about it and will be sharing more later, but for now I’m going to show you how to sew a simple button placket that works for any top made from a single pattern piece for the front and a single pattern piece for the back –a good example would be a plain ‘ol t-shirt. It’s easy and a little different to make button plackets when there are center seams down the front or back of a garment, in that case you just add some extra fabric for seam allowances and self-facings. This method basically creates a nice, neat looking placket around a slit at the front or back neckline.


You need:
Garment
Square or rectangle of fabric—knit or woven, matching or contrasting
Small scraps of lightweight fusible interfacing
Buttons
Matching thread/sewing machine
Iron/ironing board

 *First decide on the size of your placket. Mine (finished size) is 5 inches long and 1 inch wide. To determine what size rectangle you need, add ½ inch to your desired length then multiply desired width by 5 and add ½ inch. My rectangle is 5 ½ by 5 ½ inches. 

Pressing and Preparing the Placket

*Working on the wrong side, press the side edges in ¼ inch (along the length).


*Next fold the edges in one inch and press.


*Fold both sides in again (careful to measure 1 inch) and press. When unfolded your rectangle should be creased like this (these are important and will help guide the later steps). Not counting the ¼ fold on each side, you should have 5 equal segments (each the desired width of finished placket), one inch in my case. 


*Now fold the rectangle in half (matching edges of ¼ folds) and press along folded edge so that the center segment is divided in half.


Attaching Placket to the Garment

*Unfold and match this center crease to the center of your garment’s neckline with right sides together, pin in place. Use disappearing ink or a pin to mark ½ inch above the bottom of the placket.


*Sew on creases around the center segment, staying ½ inch from the bottom of the placket. Now cut from the neckline down the central crease and out to each corner of your sewn rectangle in a Y shape (as close to stitches as possible without cutting through them).


*With measuring tape in hand, snip 1/2 inch slits from the bottom of the placket (NOT cutting shirt) up to the sewn line but NOT through it. Also, snip 1 inch by 1/2 inch rectangles out of each corner, as shown. Press the 1/2 inch "flaps" up toward the placket.


Folding and Finishing 


**NOTES:
1) We are making a right over left placket for boys wear, gals traditionally button left over right. Just do these in the opposite order if sewing for a gal.
2) If you are working with thin fabric, now is the time to iron on some fusible interfacing. I used a one inch strip of lightweight on each side and it worked well.

*Working on the inside right of the garment, fold the placket to the inside, hiding two of the 1/2 inch flaps and triangle shape inside. Pressing as you go and/or using a fabric gluestick can help with this step (especially if you are trying to match a print). The goal is to hide all raw edges. Play around with this step until it lays nice and smooth. Pin securely.


*Turn to the right side to check placement and topstitch along the bottom and outside edge. When sewing on the right side, make sure that you're sewing through the placket on the inside as well.


*Turn back to the inside of the garment to finish the left side of placket. Press 1/2 inch flap up and fold the placket around raw edges. (you can see the interfacing here, it slightly covers one of my creases, but it's still clear on the other side)


*Pin in place and turn to the right side to check placement and topstitch along outside long edge, keep a pin across the bottom of the placket (This side will still be free floating, we will overlap and sew the two flaps together AFTER making buttonholes).


*Measure, mark and sew buttonholes. I made three, 17 mm buttonholes.


*When that's finished, we can overlap folds and topstitch. I sewed in a 1/4 inch wide rectangle across the bottom, forward and backstitching securely.


*Mark placement and sew on the buttons. Looky there! A fully functional button placket!!


I have a feeling I'll be going "BUTTON PLACKET CRAZY" from now on! Love those fun details!

Tuesday, July 17, 2012

Think it Through Thursday...on Tuesday: God Our Sustainer


I have a good friend who has organized a really neat weekly devotional for women by email. It's called "The Redemptive Pursuit." I occasionally write when she asks me and I'll be contributing for the next few months. Anyway, this was what I shared on Monday and I thought I'd post it here too. If you're interested in signing up to get the weekly email, go to THIS PAGE, where you can enter your email (easy to cancel later if you so desire) and also read current and past devotionals.


Psalm 62:5-8, 11-12

“Find rest, O my soul, in God alone,
My hope comes from Him.
He alone is my rock and my salvation,
He is my fortress, I will not be shaken.
My salvation and my honor depend on God,
He is my mighty rock, my refuge.
One thing God has spoken,
Two things have I heard:
That you, O God, are mighty,
And that you, O Lord, are loving.”

I am pregnant for the second time and with that has come a lot of fear and uncertainty. My first pregnancy, in 2010, was very difficult. I was put on bedrest in the hospital at just 27 weeks and told I would stay there for the duration of my pregnancy, that turned out to be 8 more weeks. My little boy was born at 33 weeks weighing 3 pounds 13 ounces  and he went straight to the NICU after birth, it was days before I could hold him. Still, we were very blessed, our sweet boy healed and grew quickly and we took him home after just two weeks.  Those 8 weeks in the hospital when we were constantly monitoring the baby’s heart rate and praying that he wouldn’t be born too soon were probably the hardest of my life. There was no way to live or hope without the assurance that God was sovereign, that we were His children and that His plan was ultimately for our good and the good of our baby son. We pored over Scripture and begged for the prayers of friends and family, there was nothing to lean on but the Lord.

This second pregnancy has been different in a lot of ways. I am at almost 30 weeks and still at home, living life! I’m being closely monitored by doctors who prescribed a series of injections to help prevent what happened before. I have not been put on bed rest, but I do have to be careful about my activity level. Overdoing things can cause contractions, and I desperately want to avoid that. My lurking fear is being back in the hospital with a tiny baby  in the NICU  and missing sweet things like snuggling my two year old, taking him to the pool and cooking dinner for my family. In my fear, I have found myself leaning on the things I can do: drink lots of water, no caffeine, don’t overdo it, get shots on time. Even though we are in exactly the same situation as my first pregnancy, helpless and with nothing to lean on but the grace of God, I grasp at the illusion of control.  I’m like the man who looks in the mirror, turns away and instantly forgets what he looks like (James 1:23-24). God took care of us so well through that first difficult pregnancy. When we were expecting the worst, He showed His grace to us in a way that was beyond what we could ask or imagine: an incredible gift and constant reminder—a healthy, perfectly normal, wild, two year old boy.

Though I am just as helpless now to keep my unborn baby safe and healthy as I was two years ago, it took physical helplessness to remind me just how dependent I was upon the sustaining hand of the Lord. There is no health unless He gives it, there is no life unless He gives it, there is no honor or work or contentment, peace or happiness, security or salvation unless He gives it. How quick I am to forget this! Even in times when what He gives is not good in my opinion, there is comfort in the knowledge of His complete sovereignty and goodness—our God is both mighty and loving.  “How deep the Father’s love for us, how vast beyond all measure, That He could give His only Son to make a wretch His treasure.”  He turned His face away from His own Son so that He could keep it turned upon us, He doesn’t abandon us in our weakness or try us beyond what we can face. We are helpless to control our circumstances, but what a comfort that we can lean on the Lord who guides every detail of our lives and who is shaping us to be more and more like His Son—all for our ultimate good and the good of His kingdom!

Monday, July 9, 2012

Sew in Tune


Today I've got an exciting announcement! I was asked to guest post over at Melly Sews and Boy, Oh Boy, Oh Boy! These two talented blog ladies came up with a fun idea for a series of boy clothes inspired by songs. The first half will be summer ideas and the second half is back-to-school related. So much fun! I don't know how I was included in this list of sewists and veteran bloggers, but I've been having a blast listening to iconic summer songs and thinking of things to make for baby P. I'm pretty sure I've settled on an idea to be posted with Sew in Tune on August 3, but not before jotting down/starting a few other projects that I'll be sharing throughout the month of July. This was a great way to get the creative wheels turning! I have to admit that with our big move from Louisiana to KY and baby #2 on the way, my motivation to dig through storage boxes, spread out fabric, kneel down on the floor and cut out patterns has occasionally flagged--this opportunity couldn't have come at a better time!

On another note, I re-opened my Etsy shop. I have a boy overall and a boy shortall posted, I'll be adding some fall and holiday things soon!

Thursday, July 5, 2012

A Whale of a Tale

While there has been a good bit of this...

Happy Fourth of July, by the way!!


There's also been a bit of this...


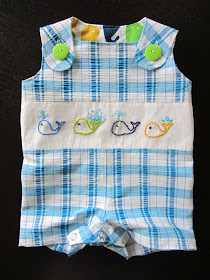
A little romper for a friend having a baby boy tomorrow. 


And she has little girls too!


Matching bloomer shorts were definitely in order. 


Dress them matching while you can folks, because one day they won't think it's so cool. 


The whale print cotton is part of Robert Kauffman's Urban Zoologie line, love it! The stretch seersucker is from Hancock's. For the bloomers, I adapted a basic girls shorts pattern, cutting them straight down at the crotch and sides instead of tapering, gathering up the extra width, then creating cuffs out of the contrasting fabric. Big, lime green buttons accent the side of each leg. For the romper, I used Simplicity 3808 (one of my faves!) but I cut out the top front pieces using the lining as a guide because I did not want pleats. I also wanted to avoid a center seam for my embroidered panel. I kept the center seam on the lower half so that the crotch would fit correctly. Fun and summery! I hope they enjoy!