Showing posts with label Pattern Review. Show all posts

Wednesday, May 30, 2012

Family Photos

I just finished up an Etsy order for a family (some of my extended family actually) who is having pictures made. Three boys and a girl. A GIRL! I got to do ruffles...


Lots of ruffles...


And use some fabrics with flowers and pinks thrown in there. It was so fun!


 I used Simplicity 2171, I think it's a little Matilda Jane'ish. Love it! I liked the pattern, I'll do a review soon and let you know what I changed.


My aunt also ordered a baby photo book (See others HERE and HERE). She requested that I add 'taggie' details, a great idea, I thought.


Fun textures, bright colors, faces they know and love...it's a baby's paradise!


Have a great day!!

Thursday, January 26, 2012

"Bring-Me-Some-Spring" Reversible Coat

I've been completely fascinated by this season of Project Run and Play, the things that these ladies are whipping out week after week is amazing! They have such great ideas and even better, they are able to execute them! This week is outerwear and since I had snagged the perfect fabric (I've been eyeing it for weeks and waiting for a sale. Finally got it for $3.99 a yard! Yes!) I decided to go ahead and sew it up so that I could "Sew Along."

I'm so happy with how it turned out. I call it the "Bring-Me-Some-Spring" Reversible Coat, because while it might still be a little sober, dark and gray outside, the bright colors and sunny, blue skies of spring are just around the corner...

(Get it?  Reversible coat... ;)


I love this lightweight, gray suiting fabric! It is soft and sturdy, warm but not bulky(bulky is bad for the ol' carseat) and machine washable. I saw it on the shelves in the fall and thought it was perfect for a boy coat. The line of bright blue is still playful enough for little guys and the dashed white line gives it a 'ticking' stripe feel. Both sides of the jacket have welt pockets (with a fun, contrasting color inside).


The fall and winter side has corduroy covered buttons. The underside of the collar is bright blue and because this coat is size 2/3 the sleeves are a little long but P will be able to wear it all through next year-I like the cuffs and pop of color that they add.


The spring side is a soft, baby wale corduroy in what I refer to as eye-popping blue. The buttons are flaming red stitched on with sunny yellow thread. I love the colors and I think P will wear this a lot during the cool spring months when we are all craving warm weather but it's still too cold for warm weather clothes.


Shoo, catching this guy in one place was a chore! I kept standing him where I wanted then sprinting away to snap a few photos then repeating the whole process again. It's worth it!

I used the 2-in-1 Reversible Coat pattern from Figuerosa and LePage's book Sewing for Boys but I added welt pockets to both sides. It's a really great pattern with lots of room for adapting to your own taste and style. I kept it pretty simple to reduce bulk and because I like simple clothes for boys!

Wednesday, January 18, 2012

Pattern Review: Burda 9990


Burda 9990
Size A (2, 3 4,  5, 6, 7, 8)
Boys pant (three length options) and vest.


Description and My Experience:

I've been needing a good, basic pants pattern for a while. You know, one with pockets, button/zip fly, belt loops, cuffs- all those little details that add interest and an alternative to elastic for boys pants and shorts! These are really simple, classic looking pants and shorts. You could do them in lightweight fabrics for spring and summer or heavier for fall and winter. It would also be pretty simple to make them flat front although I like a little added volume.

I chose the size 2, mid-calf length short. Overall, I liked this pattern and will use it again (with my notes beside me). The instructions are a tad 'underexplained' at times and the cutting lines were a little difficult to follow.  The finishing instructions are ok (more on this in "Things You Should Know"). You need some prior knowledge to finish this garment perfectly on the inside as well as the outside.  I found the illustrations very helpful. This is a pretty simple pattern, the only challenge is the zip fly. I got this pair done (minus the hem) in the space of one nap :), about 2 1/2 hours. Not too bad!


(I left off the belt loops, changed the waist band and cuffs since I'm planning to do something interesting with these shorts...hopefully interesting and not dumb looking :)


Things You Should Know about Burda 9990:
1) You need to be at least an experienced intermediate sewist to navigate this pattern. The instructions on attaching the zipper and figuring out the self-facings are not very helpful unless you have done it before, I'd suggest finding a tutorial online somewhere (or instructions from another pattern) and using that to fill in the gaps.

2) While the finishing on the outside of the garment looks professional, the finishing instructions do leave something to be desired.
A couple of things that stuck out to me:
      -Most patterns remind you to finish the raw edges of self facings before putting
       in zippers or button holes or whatever, this one did not.
      -It would be a good idea to finish the raw edges of the pocket/hip yoke before  
      attaching the front and back pieces of the pant together at side seams. You could  
      probably get away with just pinking these, but I hate seeing a mess of raveling
      threads every time I look inside a garment.

3) When you start cutting, beware!

4) Next time, I want to add topstitching to reinforce my seams on the sides and rise (front and back). That's not included in this pattern and to topstitch the rise youwould have to change the order of the directions a bit.


If you have used this pattern! Leave your comments.

Tuesday, October 11, 2011

Pattern Review: Butterick 4110


Butterick 4110
Sizes S-XL (13-30 lbs)
Baby Girl dress (4 views), Romper (4 views), Hat and Bloomer

My Experience and Description:

I just completed a really fun project! It was a classic baby girl dress with a big collar, like the ones my Mom used to dress my sister and I in when we were little. After every seam, I held up the dress "oohing" and "ahhing" over the little details and trying to get my husband to do the same thing.

The dress was a gift for my baby niece, they might use it for her baptism in November.  I wanted to use solid white because of the occasion and I also wanted it to be wintery enough for November-no, linen, thin cotton, etc... So I went with a lightweight corduroy trimmed with white crocheted cotton lace, it feels so soft on both sides and I really love the way it turned out.


I thought this pattern was very well written and easy to follow, the finishing turns out professionally and it looks nice inside and out. I like that there are several different options to choose from included in the pattern. No collar, pointed collar, scalloped collar, round collar, long, short, romper, bloomer... I actually made a pattern piece for a square collar. I just used the pointed collar and added straight lines from the shoulder and the point, meeting at a right angle. (I left the back in a point)


I love that the dress closes with buttons rather than snaps or a zipper, there's something very impersonal about a zipper on baby clothes. I will definately be using this pattern for gifts.

There are so many things you could do with this pattern. It would be precious with a white cotton collar and a flowered, striped or gingham print cotton for the dress. There are so many options and it's a very versatile pattern. It could be made in velvet for Christmas, bright patterns for a birthday party, and you could add embroidery to the collar. I really love this pattern and I give it...duh duh duuuuhh...


Five Spools! (out of five)


Things you should know about Butterick 4110:

1) There is a good bit of hand finishing involved. The dress is partially lined, so the bodice lining has to be slipstitched to the waist seam. It would be easy to add a full lining, but it will take a little finagling around the button placket.

2) When sewing/folding/cutting for the button placket, have a good example of a completed one beside you. I find that it's hard for printed instructions (even good ones) to show those kinds of things in the right scale and dimension. I like to have a good example beside me to keep from sewing then ripping over and over again or cutting where I shouldn't cut.

3) Double check all the seams at the neck and waist before you hand stitch the lining, I had sewn a little to close to the edge of my collar the first time around and had to take out all my handstitching to fix it. YUCK!

Friday, September 2, 2011

Pattern Review: McCall's 4756


McCall's 4756
Size CCB (1, 2, 3, 4)
Contains boys shortall, boys overall, girls A-Line top (with or without sleeves), girls pants or capris and optional "chick" applique


Description and My Experience:

I recently made the boy shortall in size 2 and the girl A-line top, also in a size 2. I was very pleased with how the shortall turned out ( I did make a few minor alterations, see "What You Should Know About McCall's 4756). It's simple and relatively easy to put together. Because the straps attach on the inside of the "bib," you can easily add some length to the straps for adjustment later as your child grows. I also really like that there is a long-all option. It makes this pattern season friendly. The crotch is finished with bias tape and the directions indicate using snap tape, but I sewed on my bias tape then applied snaps with a snap setter. (You'll see in the pictures I used leftover white bias strips, I should have made some matching).

The girls top was a little more challenging to sew and I chose a fabric that was a little difficult to work with. Flannel. I like that there a few different finishing options- sleeveless, short sleeved, button choices, applique, pants or capris. It would be easy to add ruffles to the bottom of the pants. I also think if you made the shirt in a heavier fabric like corduroy, it would be very cute for the fall over a turtleneck and leggings. The directions are very clear and make the finishing easy (when you don't skip steps like I might have accidentally).


 The pattern includes directions to top stitch all around the edges of the top. I liked the look of a double line so I also sewed around the bottom hem twice for continuity.


Directions are included for trimming with ric-rac around neck and hem, I used leftover bias tape that I had on hand and added some bright orange stitching.


Things You Should Know About McCall's 4756:

1) Once or twice I looked at a direction and thought, "Ok...and then what?" I would say just read through the whole thing before you start sewing and if you're new to sewing and a step doesn't make sense, bother a friend and have them explain.

2) The cutting guide for the back neck facing on the girls shirt, is the same piece for all sizes. There is the difference of one or two millimeters between each size. It is important that this difference carries over when you cut your fabric. I had to re-cut this piece becaues it was just a millimeter too big and would not lay flat when I turned it to the inside.

3) Use fusible interfacing for the straps if you are sewing with a very lightweight material like seersucker. (Even though the pattern doesn't call for it.) It wouldn't hurt to also use it to reinforce the buttons and button holes.

4) The width of the overalls can be a problem in this pattern. Toddlers are usually moving around more and starting to slim down in the belly and thigh regions :). I made a size 2 for my 15 month old, he is shorter but has a very long torso. The size 2 fit well in crotch length, but it was "unwearably" wide. I ended up taking it in about an inch on each side. I would say try it on your child before sewing up the sides if possible.

5) Stitch in the ditch in the seam under the arms of the boys shortie and overall to keep the lining from pulling out when washing. The bobbin thread will show on the inside, but top thread is totally hidden on the outside.


Here's McCall's 4756, boys shortall, size 2
Blue, white, and lime stretch seersucker (great fabric by the way, it washes so well and doesn't wrinkle), quilter's cotton lining, white 3/4" buttons. All supplies from Hancock's.

Sewed on my Pfaff, love that integrated differential feed!


Plenty of room for the ol' diapered rump!


I recently completed the full length boys overall for fall. It turned out great! I decided to line them fully so that they would be reversible and not to include the snap crotch closure. I also added a turkey applique.


Tuesday, August 30, 2011

Pattern Review: Simplicity3808


Simplicity 3808
Size A: XXS, XS, S, M, L
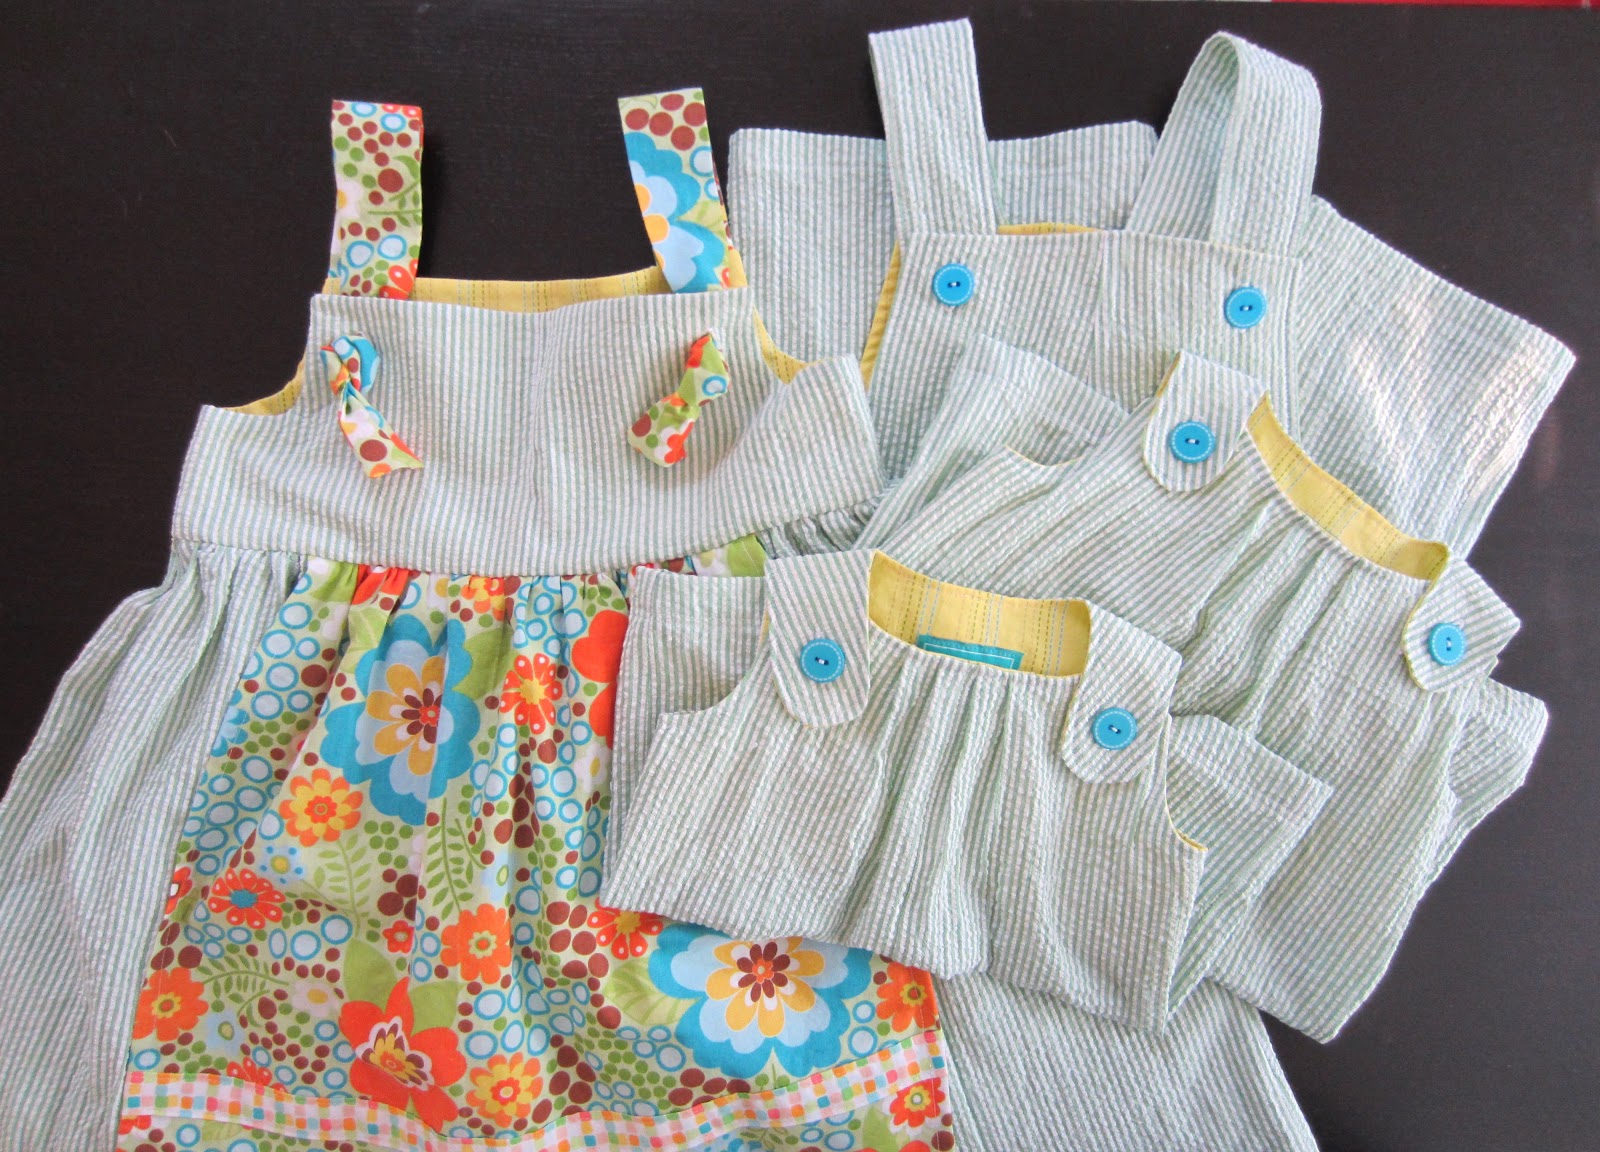
Contains patterns for girls jumper/dress/shirt with pockets and jersey shorts, boys romper/shortall, bib (with decorative embroidery and applique directions included), and diaper bag.


Description and my Experience:

I really like this pattern, it's my go-to for baby gifts! Two buttons, two button holes, no zippers and simple construction. I've made several girl dresses-in quilters cotton and in a lightweight corduroy. It turned out very well in both cases and looks great with or without pockets. The little jersey shorts are very simple, you could probably find something similar at Target or Wal Mart cheaper than the cost of the fabric.

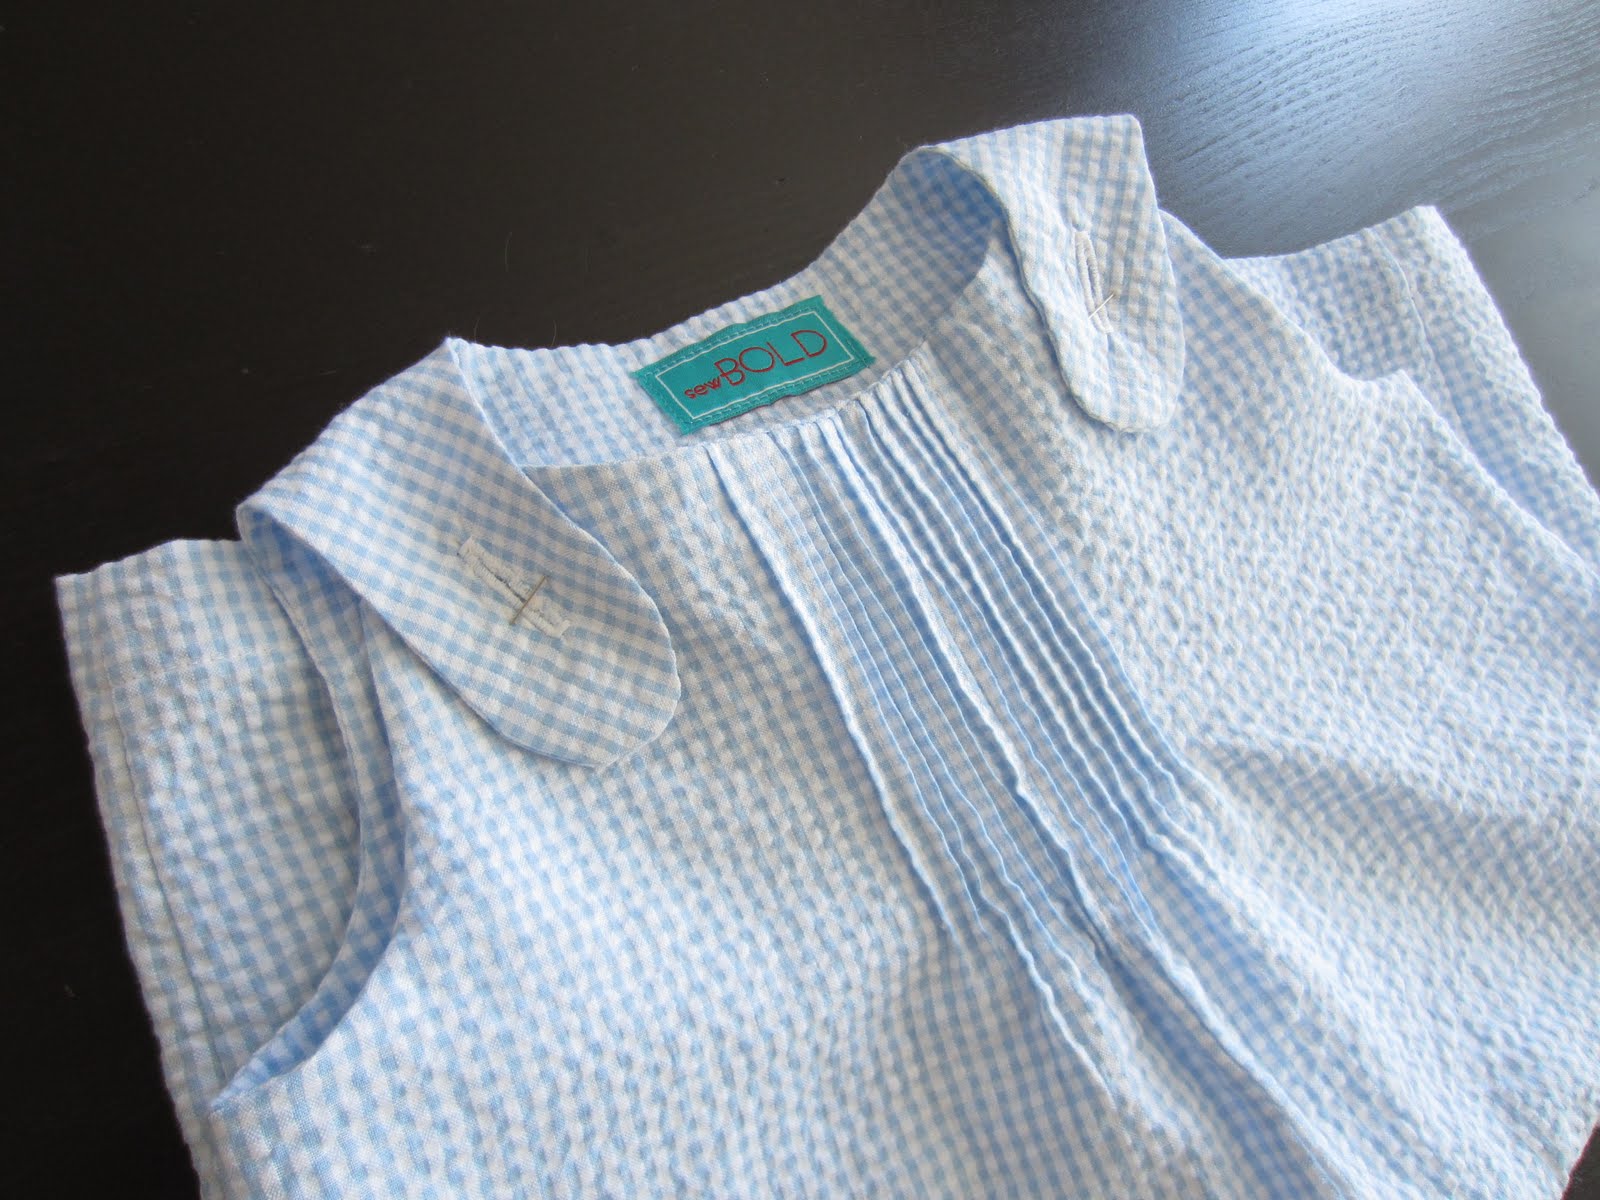
The Simplicity pattern directs you to make a pleated neckline for both the boys shortall and the girls dress. The instructions are extremely clear and easy to follow. I have done a lot of different things with the neckline. You can do a simple gathering stitch (I do this most often for dresses) or add pintucks instead of pleats. For the example below, I used the pleating instructions included, but I accented every fold with a running stitch and thick orange embroidery floss.

My favorite part of this pattern is the boy shortall. It's very simple, and it's easy to make it look professional. I also really like the shape of the neck and straps. There is lots of room for embellishment and it's easy to add a personal touch. For the boy shortie, you can either finish the crotch with snap tape (directions included with the Simplicity pattern) or make small, matching pieces of bias tape and apply snaps with a snap setter. I find that this second option comes out more neatly, but the snap setter is a $22 investment. Still, if you make baby clothes often, it is definately worth it--snap tape adds up and always leaves me cursing and shaking my clenched fist at its inventor.


Here is an example of pin tucks in place of pleats at the neckline. I think this looks a little more "fancy." It would be really sweet in solid white for a tiny baby or a baptism.


Here I made 1 inch bias tape (they're not actually cut on the bias, just strips with the grain), sewed it on, then applied snaps with a snap setter. Those are size 16 snaps, I used 15 on the dark stripe romper.  


Things You Should Know about Simplicity 3808 
1) The sizes run quite large. My 15 month old, who wears 24 month Gerber onesies, wears a medium (12 mo) in this pattern and it's a little on the big side-the large (18 mo) size completely swallowed him. I would call it more of a 24 month. Definately base your sizing choices on the child's measurements rather than age, weights and lengths given on the packet, if possible. For the romper, width can be a problem, consider narrowing a bit on the sides. Try it on your child if possible before finishing side seams and sewing in the lining. If you're making a gift for a newborn, use the XXS, the XS is probably more of a 3-6 month size even though it says 1-3 months on the pattern.

2) The pattern calls for 5/8" buttons. I almost always use 7/8" because I like a prominent button. Small sizes would look fine with smaller buttons. Obviously you would also  need to make your own markings for the button holes, the guide given on the pattern will be 5/8".

3) The pattern doesn't call  for fusible interfacing, but I think the garments turn out a little cleaner looking if you iron a few strips on the inside of your lining where the button holes and buttons will go. I just estimate the placement and iron it on before I sew the lining to the outside. Small scrap pieces are plenty.

4) I always stitch in the ditch under the arms a couple of inches to secure the lining to the outer garment even more securely. It just helps during the washing process.

5) I have not made the bib or tote bag. The directions seem just as clear as those for the garments.


Overall, I rate this pattern five out of five spools! One of my favorites!!


Here it is in action! Simplicity 3808, size Medium, Boy Romper
Black and white stripe seersucker from Joann's, lined with a quilters cotton remnant from Hobby Lobby, orange buttons from Hancock's


You can see he's still got some room in the length and width (I did not take out width, I might for the next one). I like the fall color scheme! Here in NOLA it's sleeveless weather all the way through Halloween.