Showing posts with label Sew. Show all posts

Friday, August 9, 2013

Bucket Bag...finally

I did make the bucket bag I posted about many moons ago. I've been carrying it all summer, as a matter of fact, and loving it! I lined it with a fun, floral print (Hancocks) and the neon laminate from Purl Bee is just as lovely as I'd imagined. It was easy to sew with (I put a piece of scotch tape on the bottom of my presser foot when I was stitching on the laminate side) and it was flexible enough for piping. I added some fat piping around the bottom.


I lined the whole inside with pockets--they're great for keeping drinks upright and holding toys. I like the single strap a lot--it's easier to keep on my shoulder than if I'm holding a baby or wearing the ergo. I'm also a fan of bags that stand upright when you set them down, the sturdy canvas and laminate, plus piping on the bottom give it a lot of stability.


I like it! Make one!

Thursday, April 11, 2013

Bucket Tote Mania


I am completely obsessed with these bucket totes over at Ikatbag. Genius and beautiful! I can't stop looking at them. I love the combinations of piping and great prints. They look so sturdy.

Lunch Bag-Ikatbag

This is the inside of the bag, but it shows how great the handles are. One short and one long, the long shoulder strap one pulls through the short one, I am going to make one!
Bucket tote--Ikatbag

I ordered some Michael Miller neon laminate fabric from Purl Bee (I had a gift card burning a hole in my pocket, thanks Hannie!) It came yesterday and is stunning...and blinding. I've got some great bucket tote ideas and there is piping involved! Woo! My giant shoulder bag was stolen from my car around Thanksgiving and I have been living out of a tiny purse--let's just say it's not up to the challenge of diapers, juice cups, water bottle, toys, books, changes of clothes, snacks...It needs a break and a replacement. 


Tuesday, February 26, 2013

Pinterest Challenge: Aden and Anais Swaddlers

I'm working on a few baby gifts this week. It corresponded perfectly with the Pinterest challenge going on over at Young House Love. I've had some "Pinspirations" in mind.

The Wiegands

I've been drooling over this bold, black and white baby blanket above. It looks like a knit, but I chose woven cotton gauze for my project. Like Aden and Anais swaddling blankets (TUTORIAL HERE).

I also have been loving all the triangle/tribal type prints that are popping up.

See Kate Sew

The Wiegands

Here are my Pinterest inspired, hand stamped, swaddling blankets.


They're cotton gauze, a little stretchy and beautifully breathable...happy baby!  For gifts you can roll them up and tie with cute ribbon and a little tag. I love that the colors and patterns are a bit nontraditional for babies, I get tired of dinosaurs and animals.


For my blankets, I decided to go with potato stamping so that I could have complete freedom on size and shape...not to mention it's cheap.


I cut the potatoes in half then scratch the shape into them with a blunt pencil (if it's something more complicated) then carefully cut around it with a knife. You have to dry it off with paper towels every so often because water leeches out of the potato and can give you some bleeding if you're not careful. They will last a few days if you wrap them up with plastic, and they work best if you stick with a single color per stamp. You could start out stamping with your lightest color, wipe off as much paint as you can, then go darker at the end--dark to light makes a bit of a mess. 

For the color gradient on the black trees blanket, I applied paint to the stamp with a foam brush then stamped three times before reapplying paint. I always use tulip, soft, matte fabric paint and stamped it in a completely random pattern, I like it! 


The other blanket is all triangles of different sizes and colors.


I'm in love with this one.


Hope these gifts will be enjoyed! Visit THIS POST for a complete, step by step tutorial on making knock off Aden and Anais Swaddlers. 


BLOOPER: 

Funny story ...I picked up a 99 cent foam stamp from hobby lobby...here it is:


Hmm, devil face? Perfect for a baby blanket right? 

Heel no! It totally looked like an owl before stamping. I blotted out the scary mouth feathers and it took some of the frightening out of this little blanket. 

I just want to know who is in charge of checking to make sure stamps don't inadvertently look like devil faces. I think Hobby Lobby in particular would be horrified by this.

(owls to the left, devils to the right... hands in the air! sorry, that sounded so much like a line dance that I couldn't resist...)


Thursday, January 31, 2013

Costume Tutorial: Plump Pumpkin

Last Halloween my bigger boy wanted to be a monkey so I snatched up a super cheap costume at Old Navy (they carry a pretty cute assortment every year and they usually go on sale before Halloween, just FYI :). 

I'm all about dressing the babes in things that I know they won't want to wear later and I never like to spend a ton, who knows if they will be awake to wear it...so...the Plump Pumpkin costume was born. It was easy and relatively quick. The wedges take a bit of time, but the 3D texture is totally worth it. This is a good project to do during naptime with a few episodes of Downton Abbey rolling!

Can anyone resist a little, fat baby dressed as a pumpkin?

You Need: 
1 Yard of orange fleece and a few scraps of green (I had some leftover, but add a little extra if you're
      making a larger version, my little guy was wearing about a 3 month size here)
polyfill or scrap batting
snaps (sew on or with a snap setter, you could probably get away with velcro)
matching thread, sewing machine, etc...
*Sleeper, sweatpants, tights or other clothing of your choice to go under the costume. I had a cute orange and black striped sleeper that worked perfectly. What we are making here is sort of a jumper. 

To Make:
1. Build the Foundation
Note: You could skip this step if you have an orange onesie-bought or dyed-that you want to use.


2. Make the wedges
Each wedge is two pattern pieces sewn with right sides together. Leave a small opening to turn right sides out and stuff with polyfill or scrap batting. Then stitch the opening closed. They should look like crazy carrots...

The number and size of the wedges depends on the size of your child and your preferred spacing. I wanted them very close together and the largest two are a little longer than the length from neck to crotch opening.

I used two extra large, four large, four medium and two small wedges. You want to end up with this.


The largest center wedge reaches from the neckline to the crotch opening (one in front and one in back), then they descend in size-the smallest being under each arm. Use the onesie to estimate the length of your wedges, width is up to you. Here they are all laid out so you can get a feel for the variation in size and how many you will need (these are sewn together but not stuffed yet).

After you complete the wedges, pin them in place on your foundation onesie (photo above), adjust as needed and sew them on by hand. I just did a few little hidden stitches at the top and bottom of each wedge. You could get fancy and sew them on in other spots as well or use some fabric glue, it really just depends on how you want them to lay, how active your child is and how finicky you are as a sewist/mama. I didn't mind a little twistage. :)


Fun, simple costume with lots of room to personalize. Link back and leave comments or send pics if you make one! I'd love to see it!


I'll be back this week or next with the hat pattern and tutorial! Gotta love a pumpkin hat!


Friday, September 14, 2012

I made a...

QUILT!! I made a quilt, a legitimate quilt. I pieced a queen sized quilt last year but chickened out when it came to actually 'quilting' it. For this one, I was determined to do it the right way. I used a template and a rotary cutter to perfectly square up all the pieces, pressed all the seams open, and used hundreds of safety pins to make sure that the layers of batting, backing and top were smooth and flat before quilting. Bingo!

I used Jay Bird Quilts' "Large Dot Party" pattern and it was really simple. I used all prints instead of a single solid color with a few contrasting prints like the directions recommended. I'd like to try that too.


You can see here that P's room is still a work in progress. Lamps with no shades...nothing hung on the walls...no rails on the 'big boy bed.' We are slowly transitioning from crib to bed, I'm waiting to see how he does at night with baby brother's room right next door before I give up the luxury of having him contained. I love, love, love the bed! It's exactly how I imagined it (think Downton Abbey hospital beds :). It's from Pottery Barn Kids if anyone is interested, I snatched it up when they went on sale a couple of weeks ago.


The quilt is backed with a soft, black and white ticking striped, cotton duck (on sale at Hancock's right now) and I used a super low loft batting. I love the back almost as much as the front and will definitely  use both sides, depending on what sheets are on the bed, etc...


One of the things I adore about quilts is how they look after being washed and dried, I think I'll love this one even more after a few washes. There are raw edges around every circular shape. I think it will add a lot of softness and a vintage feel when the edges fray.


P had a ball pointing out animals and toys and colors. I am wild about every single print and tried to keep it playful and boyish, he will be able to use this for years. I used so many prints that I'm not going to list them all, if you have a specific question just leave it in the comments section.


The only shortcut I took with this quilt was to use the backing for a self-binding, instead of cutting bias strips and all that. I like it and don't think it takes away from the look or the quality at all. I totally finished it in 3 nap times, not bad for a twin sized quilt. (Disclaimer: my little guy takes anywhere from a 3 to 4 hour nap-so maybe a 12 hour project)

1) Preparing/cutting/assembling the blocks
2) Piecing the quilt top
3) Laying out quilt sandwich/pinning/quilting/binding

I think he likes it! Cozy!


Thursday, August 2, 2012

Come Visit...

I shared a few weeks ago that I would be guest posting for Boy, Oh Boy, Oh Boy and Melly Sews for their "Sew in Tune" series. It's been really fun to see what all these creative Mamas have come up with so far and great to get some new ideas for boy projects. If you haven't already been following, take a look! My post is going up over at Boy, Oh Boy, Oh Boy this morning! Check it out, P and I had a lot of fun with this...there may even be a super simple, summer recipe involved.

Thursday, July 26, 2012

Tutorial: Tribal Print Denim Shorts

Have you seen these denim cutoffs with tribal print panels added? They're all over Pinterest.

Free People


Free People Rodeo Shorts

Cute right!? Some have a panel in the front and also a contrasting strip on the back yoke. My sister asked me to make a pair for her out of some cast off jeans so I thought I'd take some photos and share. It was a pretty quick project, here's how: 

You Need: 
Shorts (hemmed or frayed)
small pieces of fabric (cotton, knit, poly, etc... just be sure that it can take a little heat)
small pieces of Pellon "Wonder Web" (this is great stuff, it's over by the interfacing)
matching thread, scissors, iron, denim needle, stitch ripper, etc...

The Steps: 
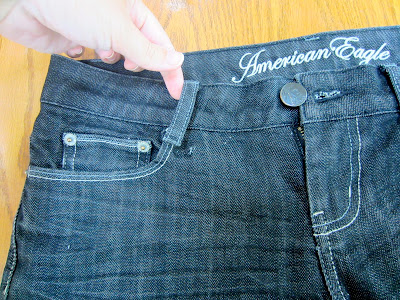
1) Start by using a stitch ripper to remove stitches from the bottom of the belt loops (I did all of them so that I could sew them back on with black thread instead of taupe, just a time saver :)


2) Use the wonder web to create a template for each of the fabric pieces. Cut them so that they fit perfectly within the area you want to cover with fabric. We will add some allowance for hems in the next step. (You can see here I started with two separate pieces in the back but that really wasn't necessary)


3) Lay the wonder web on your fabric of choice; using it as a template, cut around the pieces adding a 1/4 " hem allowance on all sides. 


4) Head to the ironing board and pin wonder web to the wrong side of the newly cut pattern pieces. Snip corners off diagonally to reduce bulk then begin folding the fabric around the wonder web and pressing it down with a hot iron. (See photos) Avoid touching the web with your iron or you'll have a sticky mess. 


Snip wherever necessary to manipulate the fabric around the "wonder web template." The center bottom of the yoke (below) needs a snip to keep the correct angle and make a row of snips around the curve of the pocket for the front panel. 


5) When you're finished pressing, pin the pieces to the shorts. Use lots of pins and be prepared to pull and tuck so that the pieces fit correctly. (WAIT UNTIL AFTER SEWING TO PRESS, that gives you the chance to shift the fabric around and avoid weird wrinkles.)


6) Sewing with matching thread, stitch as close to the edge of the fabric as possible, smoothing as you go and keeping the belt loops out of the way.


 When you apply the front panel, finagle your way inside the pocket so that you don't stitch it closed, then sew around the outside edges.


7) After you finish stitching, press the shorts, heating wonder web and fusing the fabric even more securely to the shorts.


8) Last step! Sew the belt loops back in place. Done! A trendy, easy, upcycle!


As soon as I get one, I'll add a picture of my sis modeling these! I would have tried them on myself...but...the effect (considering my 7 month pregnant belly) wouldn't have been exactly the same :).

By the way, this fabric is a $1/yd remnant from Hancocks. It feels like rayon but is probably some other kind of cotton/poly blend because it ironed just fine. I think the light weight helped keep these shorts from feeling too bulky.