Showing posts with label Tutorial. Show all posts

Tuesday, February 26, 2013

Pinterest Challenge: Aden and Anais Swaddlers

I'm working on a few baby gifts this week. It corresponded perfectly with the Pinterest challenge going on over at Young House Love. I've had some "Pinspirations" in mind.

The Wiegands

I've been drooling over this bold, black and white baby blanket above. It looks like a knit, but I chose woven cotton gauze for my project. Like Aden and Anais swaddling blankets (TUTORIAL HERE).

I also have been loving all the triangle/tribal type prints that are popping up.

See Kate Sew

The Wiegands

Here are my Pinterest inspired, hand stamped, swaddling blankets.


They're cotton gauze, a little stretchy and beautifully breathable...happy baby!  For gifts you can roll them up and tie with cute ribbon and a little tag. I love that the colors and patterns are a bit nontraditional for babies, I get tired of dinosaurs and animals.


For my blankets, I decided to go with potato stamping so that I could have complete freedom on size and shape...not to mention it's cheap.


I cut the potatoes in half then scratch the shape into them with a blunt pencil (if it's something more complicated) then carefully cut around it with a knife. You have to dry it off with paper towels every so often because water leeches out of the potato and can give you some bleeding if you're not careful. They will last a few days if you wrap them up with plastic, and they work best if you stick with a single color per stamp. You could start out stamping with your lightest color, wipe off as much paint as you can, then go darker at the end--dark to light makes a bit of a mess. 

For the color gradient on the black trees blanket, I applied paint to the stamp with a foam brush then stamped three times before reapplying paint. I always use tulip, soft, matte fabric paint and stamped it in a completely random pattern, I like it! 


The other blanket is all triangles of different sizes and colors.


I'm in love with this one.


Hope these gifts will be enjoyed! Visit THIS POST for a complete, step by step tutorial on making knock off Aden and Anais Swaddlers. 


BLOOPER: 

Funny story ...I picked up a 99 cent foam stamp from hobby lobby...here it is:


Hmm, devil face? Perfect for a baby blanket right? 

Heel no! It totally looked like an owl before stamping. I blotted out the scary mouth feathers and it took some of the frightening out of this little blanket. 

I just want to know who is in charge of checking to make sure stamps don't inadvertently look like devil faces. I think Hobby Lobby in particular would be horrified by this.

(owls to the left, devils to the right... hands in the air! sorry, that sounded so much like a line dance that I couldn't resist...)


Wednesday, February 13, 2013

DIY Magnet Boards

So, I am working on and improving P's big boy room one small project at a time. I've got a couple of projects on my list (I'll share a to do list in the next few days). One of the things I can cross off are magnet boards for one of the bare walls. I checked them out on Land of Nod ($24.95 for a 15 x 15 inch square). I wanted something a little bigger and didn't want to shell out $50 for two. The description said it was made of painted stainless steel so I figured I could make something similar. Off to Lowe's I went and bingo!! A whole shelf of steel pieces in different sizes and thicknesses (intended for welding)! Be careful when you are fiddling through these because they are a little sharp and they're not stainless so there is sort of a black layer. Also take a magnet with you, half of the panels in the same area are actually aluminum...not magnetic.

I came home with two panels, 12 x 18 inches at $4.00 each. Not bad! Add the $4-$8 for spray primer and paint and that's it!

YOU NEED: 
steel panels (choose the thin panels so that you can pierce them with a nail or drill )
hammer
sharp, sturdy nails (medium thickness for making holes)
small nails or screws for hanging
spray primer, spray paint (satin or gloss)
work bench, indestructible table, scrap wood, etc... to support the metal as you hammer/drill


1) I used our sturdy patio table to make holes, the cutouts perfectly supported the metal as I pierced holes. I can't guarantee that this won't break or bend your table so do this at your own risk. Several pieces of scrap wood or something like that could also work, anything that keeps the metal from bending. 

2) Use a heavy duty nail to make a hole, pull it out, flip the metal panel over and you'll see some nasty sharp edges. Place it on a smooth, supportive surface (like a piece of wood) and hammer flat. 

3) In a well ventilated area, spray a thin coat of primer on the back of the panels, allow to dry. Spray primer on the front, then follow with thin, even coats in a color of your choice (three coats of gloss for me) drying well between layers. 


4) I let my magnet boards dry about 24 hours then popped them on the wall using small nails. It's working really well so far and have been a hit with the boy. He has already added some beautiful crayon drawings :) and a Valentine from a friend.


I don't anticipate damage to the wall. The primer on the back should keep the black residue from transferring to the wall. The nail holes are so flat that I don't think they will be a problem, but I'll have to patch the screw or nail holes if I take them off so it shouldn't be tough to fix any scratches at the same time. 

I'd love to see if you make these yourself! Leave comments!

Thursday, February 7, 2013

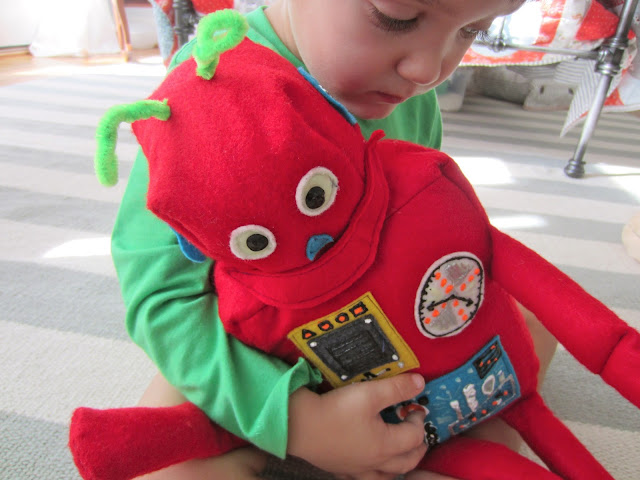
Robot Softie: A Mini-Tutorial


My boy has been all about the robots lately. Curious George, Sesame Street and Duck Tales (brings back memories, doesn't it, you children of the 80's and 90's?) all have episodes involving robots. So fun and so much room for imagination!

My baby kept asking for a red robot, several days in a row that was all he could talk about...so...I bought some felt and fabric paint and started sewing...because, well, I had laundry to do and I'd rather sew...


You Need: 
1/2 yd of felt (one main color and small pieces for the details, I bought a few of those little 25 cent sheets in different colors)
fabric puff paint (various colors, I got one glow in the dark as well and that turned out so cute!)
polyfill
pipe cleaners
buttons, trim, etc...
fabric glue

To Make: 

1) This robot is made up of one large rectangle (two large rectangles for the front and back, two long rectangles for the sides and two small rectangles for the ends), one square (head, 6 sides all equal), two arms and two legs (just long, narrow rectangles folded in half, stitched and stuffed)
-the sizing is completely up to you, mine is pretty large
-see this tutorial on making blocks for tips on stitching yours together

2) Cut out your pattern pieces, mark which ones will be front, back, face, ears, etc... and add your details. The sky is the limit. I did a lot with paint, felt and a few buttons, but you could add dials, moving parts, etc... I added a velcro flap on the back of the robot and painted what looked like a battery and other electronic type things underneath. You can tell I am very informed about mechanical husbandry and such.
-go crazy with the fun stuff then let it all dry 6-8 hours or overnight

3) Sew up the head cube (I cut a hole where the neck would be to turn right sides out and fill with stuffing, I knew it would be covered up.) Turn right sides out, stuff with polyfill, sew the opening closed and set aside.
4) Sew up the arms and legs, turn right sides out, stuff with polyfill and pin in the appropriate places to the front rectangle of your robot's body.

5) Sew up the robot's body. (again, I cut a hole at the neck--shorter than the size of the head--to turn and stuff). Turn right sides out, stuff with polyfill, sew opening closed. Using fabric glue, glue head to neck and pin the head to the body so that it dries firmly attached. I wedged my robot between my sewing machine and a stack of books for a few hours. You can go ahead and glue on your mouth at this point. It helps cover up the joint between the robot's head and body as well as looking pretty darn cute.

I used pipe cleaners for the antennae, but I think next time I'll sew something. They've become a sort of handle that P uses to carry him around and it's taking its toll. A fun and easy project! I'd love to see some different versions if you make them!


Wednesday, November 21, 2012

Tutorial: Draft Stopper + Noise Muffler=Sleep Sweeter


I love this thing. It helps me keep my sanity. 


Having two young children has taught me something: two babies awake at 2 am and howling for the attention of just one person is really not fun. The scenario is that the infant cries for milk and the toddler hears him and awakens...screaming. I decided to make a little something to keep this scenario from repeating itself every three hours until the end of time... (read that again but with a slightly frantic tone of voice). 

Don't get me wrong, there are tons of GREAT things about having two very young babies (one 2 years and one 7 weeks, to be precise), but sleep deprivation is not on my list. I'm one of those people who can't remember words when I'm short on sleep. Like last night I was trying to tell a story and couldn't remember the word...wait what was it again?...oh, yeah...werewolf. 

So I made this thing and it was really easy. It has multiple purposes--it stops drafts, blocks out noise (both while looking a little more chic and a little easier to manage than a towel stuffed under the door) and helps us all sleep a little sweeter. 


You need:
heavy-weight fusible fleece
home decor weight cotton 
   -2 rectangles
   -width= 9 inches+door thickness 
   -length=width of the doorway plus one inch
sewing machine with a sharp heavy-duty needle, thread, iron, yardstick, disappearing marker
5 lbs of rice

1) Cut out your pattern pieces. Two rectangles of home decor weight cotton using the specifications above, then back each piece with fusible fleece (leave about 1/2 inch of fabric 'unfleeced' on one short end to make it easier to stitch closed at the end.). The fleece helps make the stopper feel more sturdy, reinforcing the fabric, and it also takes up some space so you don't need quite as much rice to fill it. 

2) Pin fabric right sides together, with 1/2" seam allowance,  sew along both long sides and one short side. Turn right sides out through the open end. Now you should have something that looks like the photo below (without the two lines of stitches in the middle, that's the next step). 

3) Using the yardstick and disappearing marker, measure in 4 inches from each side seam and draw a straight line (the distance between the two lines should be approximately the thickness of your door). Using matching thread, sew along each marked line-stopping about 3/4 inch from the open end. Then you should have this:


Closed end:


Open end from top:


Leave some room so you can turn the raw edges under:


4) Sorry, I didn't photograph this next step because my hands were full of thousands of grains of rice. You could use a funnel, but I took my chances and it worked out ok. Fill each side of the stopper with rice, be sure to leave enough space for folding under and for your machine foot and don't fill the "under-the-door" part.

5) Now tuck the raw edges in, pin, and stitch across the opening--forward and back stitching securely. Trim any loose threads and slide it under the door!


I love mine! The best part is that it slides with the door, no adjusting or slipping on towels (that happened more than once in my house). They really do help block noise, I tested it. This thing is for real!

Comment if you make one and love it or if you have suggestions to make it better!

(The cute red chevron fabric came from Hobby Lobby). 

Thursday, November 1, 2012

Fall


Beware, this is a picture heavy post with all kinds of fall updates! I'm trying to get ya'll filled in with details from my 5 week absence. We are enjoying Baby V, figuring out a new normal and feeling incredibly blessed!

I haven't experienced fall since 2010. In New Orleans, we enjoyed summer and spring-like weather all year long, but I have to say...I missed cool, crisp mornings and that wet, earthy smell you only get once the leaves are lying in piles on the ground. I love all the typical fall activities. Right after V was born, I took P to the apple orchard with some friends. We ate apple cider doughnuts, fed animals, drank cider slushies, slid down a slide on burlap sacks and sat on pumpkins. It was thrilling :). 


I've also had grand ideas of taking pictures of my two boys with some beautiful, fall foliage in the background. I picked a gorgeous, warm day and we tried...I took 30 pictures...this is the "good" one. 


We did get a few belly laughs out of the deal...


The leaves were beautiful at the lake this year, here's P with Papa catching his first fish. His favorite part was pushing the release button and plopping the fish back in the water then reeling it in just to start all over. 


Another iconic (at least in my childhood memory) fall thing we missed last year were woolly worms, P calls them "Squirmies" and collects them in his bike basket. 


And Halloween! Love it, just love it!

P wanted to be a monkey (an "Ooh-Ah-Ah" in his language), I picked up a costume from Old Navy. It was super warm which was perfect for the drizzly, 35 degree, trick-or-treating. V was a pumpkin. Can you get any cuter really? I made this costume and I'm going to be posting a tutorial...which I realize no one will use until next year. Maybe you want a little, baby pumpkin for Thanksgiving though? The hat is certainly fall appropriate by itself.


My Mom and I did some practice trick-or-treating with P before the big night. He went up to a bedroom door, knocked, held out his pumpkin bucket, said "Candy" and then "Thank you!"

Yes, we tried to teach him to say "trick-or-treat" but he's a very literal child. Example: most of the folks handing out candy stood outside on their porches, P walked right past them to knock on the door before backtracking to pick up a treat. I wish I had it on video.


V accompanied us, he stayed snug as a bug in his carseat, wearing his PUMPKIN HAT!!


Can't express to you how much I love this hat, it was very easy! (Tutorial to come) Please make one for Thanksgiving.


On a pumpkin sidenote, you must go to Trader Joe's and buy the Pumpkin Butter ASAP. 

Or STASAP!

"Sooner than as soon as possible." (Gilmore Girls reference for all of you GG fans). 

It is awesome, especially when you toast an english muffin, slather it with butter then add a thin layer of Pumpkin Butter. I like it so much I feel like it should have a nickname...Pum Butt (nope)...PB (already been done)...oh well. 

Thursday, August 2, 2012

Come Visit...

I shared a few weeks ago that I would be guest posting for Boy, Oh Boy, Oh Boy and Melly Sews for their "Sew in Tune" series. It's been really fun to see what all these creative Mamas have come up with so far and great to get some new ideas for boy projects. If you haven't already been following, take a look! My post is going up over at Boy, Oh Boy, Oh Boy this morning! Check it out, P and I had a lot of fun with this...there may even be a super simple, summer recipe involved.

Thursday, July 26, 2012

Tutorial: Tribal Print Denim Shorts

Have you seen these denim cutoffs with tribal print panels added? They're all over Pinterest.

Free People


Free People Rodeo Shorts

Cute right!? Some have a panel in the front and also a contrasting strip on the back yoke. My sister asked me to make a pair for her out of some cast off jeans so I thought I'd take some photos and share. It was a pretty quick project, here's how: 

You Need: 
Shorts (hemmed or frayed)
small pieces of fabric (cotton, knit, poly, etc... just be sure that it can take a little heat)
small pieces of Pellon "Wonder Web" (this is great stuff, it's over by the interfacing)
matching thread, scissors, iron, denim needle, stitch ripper, etc...

The Steps: 
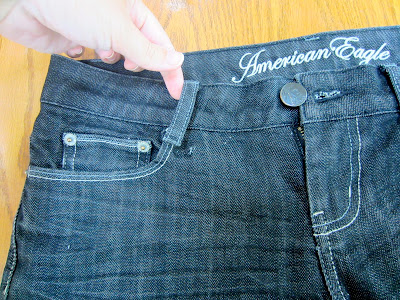
1) Start by using a stitch ripper to remove stitches from the bottom of the belt loops (I did all of them so that I could sew them back on with black thread instead of taupe, just a time saver :)


2) Use the wonder web to create a template for each of the fabric pieces. Cut them so that they fit perfectly within the area you want to cover with fabric. We will add some allowance for hems in the next step. (You can see here I started with two separate pieces in the back but that really wasn't necessary)


3) Lay the wonder web on your fabric of choice; using it as a template, cut around the pieces adding a 1/4 " hem allowance on all sides. 


4) Head to the ironing board and pin wonder web to the wrong side of the newly cut pattern pieces. Snip corners off diagonally to reduce bulk then begin folding the fabric around the wonder web and pressing it down with a hot iron. (See photos) Avoid touching the web with your iron or you'll have a sticky mess. 


Snip wherever necessary to manipulate the fabric around the "wonder web template." The center bottom of the yoke (below) needs a snip to keep the correct angle and make a row of snips around the curve of the pocket for the front panel. 


5) When you're finished pressing, pin the pieces to the shorts. Use lots of pins and be prepared to pull and tuck so that the pieces fit correctly. (WAIT UNTIL AFTER SEWING TO PRESS, that gives you the chance to shift the fabric around and avoid weird wrinkles.)


6) Sewing with matching thread, stitch as close to the edge of the fabric as possible, smoothing as you go and keeping the belt loops out of the way.


 When you apply the front panel, finagle your way inside the pocket so that you don't stitch it closed, then sew around the outside edges.


7) After you finish stitching, press the shorts, heating wonder web and fusing the fabric even more securely to the shorts.


8) Last step! Sew the belt loops back in place. Done! A trendy, easy, upcycle!


As soon as I get one, I'll add a picture of my sis modeling these! I would have tried them on myself...but...the effect (considering my 7 month pregnant belly) wouldn't have been exactly the same :).

By the way, this fabric is a $1/yd remnant from Hancocks. It feels like rayon but is probably some other kind of cotton/poly blend because it ironed just fine. I think the light weight helped keep these shorts from feeling too bulky.