Showing posts with label Boys. Show all posts

Friday, September 14, 2012

I made a...

QUILT!! I made a quilt, a legitimate quilt. I pieced a queen sized quilt last year but chickened out when it came to actually 'quilting' it. For this one, I was determined to do it the right way. I used a template and a rotary cutter to perfectly square up all the pieces, pressed all the seams open, and used hundreds of safety pins to make sure that the layers of batting, backing and top were smooth and flat before quilting. Bingo!

I used Jay Bird Quilts' "Large Dot Party" pattern and it was really simple. I used all prints instead of a single solid color with a few contrasting prints like the directions recommended. I'd like to try that too.


You can see here that P's room is still a work in progress. Lamps with no shades...nothing hung on the walls...no rails on the 'big boy bed.' We are slowly transitioning from crib to bed, I'm waiting to see how he does at night with baby brother's room right next door before I give up the luxury of having him contained. I love, love, love the bed! It's exactly how I imagined it (think Downton Abbey hospital beds :). It's from Pottery Barn Kids if anyone is interested, I snatched it up when they went on sale a couple of weeks ago.


The quilt is backed with a soft, black and white ticking striped, cotton duck (on sale at Hancock's right now) and I used a super low loft batting. I love the back almost as much as the front and will definitely  use both sides, depending on what sheets are on the bed, etc...


One of the things I adore about quilts is how they look after being washed and dried, I think I'll love this one even more after a few washes. There are raw edges around every circular shape. I think it will add a lot of softness and a vintage feel when the edges fray.


P had a ball pointing out animals and toys and colors. I am wild about every single print and tried to keep it playful and boyish, he will be able to use this for years. I used so many prints that I'm not going to list them all, if you have a specific question just leave it in the comments section.


The only shortcut I took with this quilt was to use the backing for a self-binding, instead of cutting bias strips and all that. I like it and don't think it takes away from the look or the quality at all. I totally finished it in 3 nap times, not bad for a twin sized quilt. (Disclaimer: my little guy takes anywhere from a 3 to 4 hour nap-so maybe a 12 hour project)

1) Preparing/cutting/assembling the blocks
2) Piecing the quilt top
3) Laying out quilt sandwich/pinning/quilting/binding

I think he likes it! Cozy!


Friday, July 20, 2012

"Tie-in'-It-Up" Tee

Back in April a good college friend, whom I don't get to see nearly often enough :), emailed and asked me to make a t-shirt with an appliqué tie on the front for her little man's first birthday party. I have seen these everywhere...bibs with ties, tee's and onesies with ties, you name it...but I've never made one myself. So I was excited to do it. I found an inexpensive 18-24 month tee at Old Navy, it had a chest pocket but I removed that before pre-washing and drying. You can't even see where it was.

This is a quick and easy project!

Here's what you need: 
Tee, onesie, bib, etc...
small piece of cotton fabric (woven or knit is fine, just make sure it's washable)
lightweight and medium weight fusible interfacing
chalk or disappearing ink pen
pins, thread, sewing machine, scissors


1) First decide on the size and shape of your tie. This is personal preference. Fatter and shorter makes it look more "cartoonish," my friend specifically requested a more narrow, realistic tie. Practice on tissue paper until you get what you want, keep it proportional to the garment you are working with. Also, be sure that when you cut it out, that the left and right sides are symmetrical.

2) Back the tie with lightweight fusible interfacing and press a strip of medium weight inside the shirt. Position the tie and pin securely. Set your machine to a dense, wide zig-zag stitch (I used 0.8 density and between 2.8 and 3.0 width) and turn the thread tension down a bit (I used 3). See my "Tips and Tricks to Applique." Careful not to stretch the tee as you sew, sew the tie to the shirt.


3) Peel away and trim off as much of the medium weight interfacing as possible from the inside of the shirt (I find it makes the shirt feel a bit stiff if left on). Press with a little steam if you have any funny wrinkles. That's it! Enjoy!


Even better when it's adorning an adorable chunk of baby boy! Happy birthday little guy!


Thursday, July 19, 2012

Tutorial: Simple Button Placket


This week I’ve been drafting a pattern for a new outfit for P. I’m really excited about it and will be sharing more later, but for now I’m going to show you how to sew a simple button placket that works for any top made from a single pattern piece for the front and a single pattern piece for the back –a good example would be a plain ‘ol t-shirt. It’s easy and a little different to make button plackets when there are center seams down the front or back of a garment, in that case you just add some extra fabric for seam allowances and self-facings. This method basically creates a nice, neat looking placket around a slit at the front or back neckline.


You need:
Garment
Square or rectangle of fabric—knit or woven, matching or contrasting
Small scraps of lightweight fusible interfacing
Buttons
Matching thread/sewing machine
Iron/ironing board

 *First decide on the size of your placket. Mine (finished size) is 5 inches long and 1 inch wide. To determine what size rectangle you need, add ½ inch to your desired length then multiply desired width by 5 and add ½ inch. My rectangle is 5 ½ by 5 ½ inches. 

Pressing and Preparing the Placket

*Working on the wrong side, press the side edges in ¼ inch (along the length).


*Next fold the edges in one inch and press.


*Fold both sides in again (careful to measure 1 inch) and press. When unfolded your rectangle should be creased like this (these are important and will help guide the later steps). Not counting the ¼ fold on each side, you should have 5 equal segments (each the desired width of finished placket), one inch in my case. 


*Now fold the rectangle in half (matching edges of ¼ folds) and press along folded edge so that the center segment is divided in half.


Attaching Placket to the Garment

*Unfold and match this center crease to the center of your garment’s neckline with right sides together, pin in place. Use disappearing ink or a pin to mark ½ inch above the bottom of the placket.


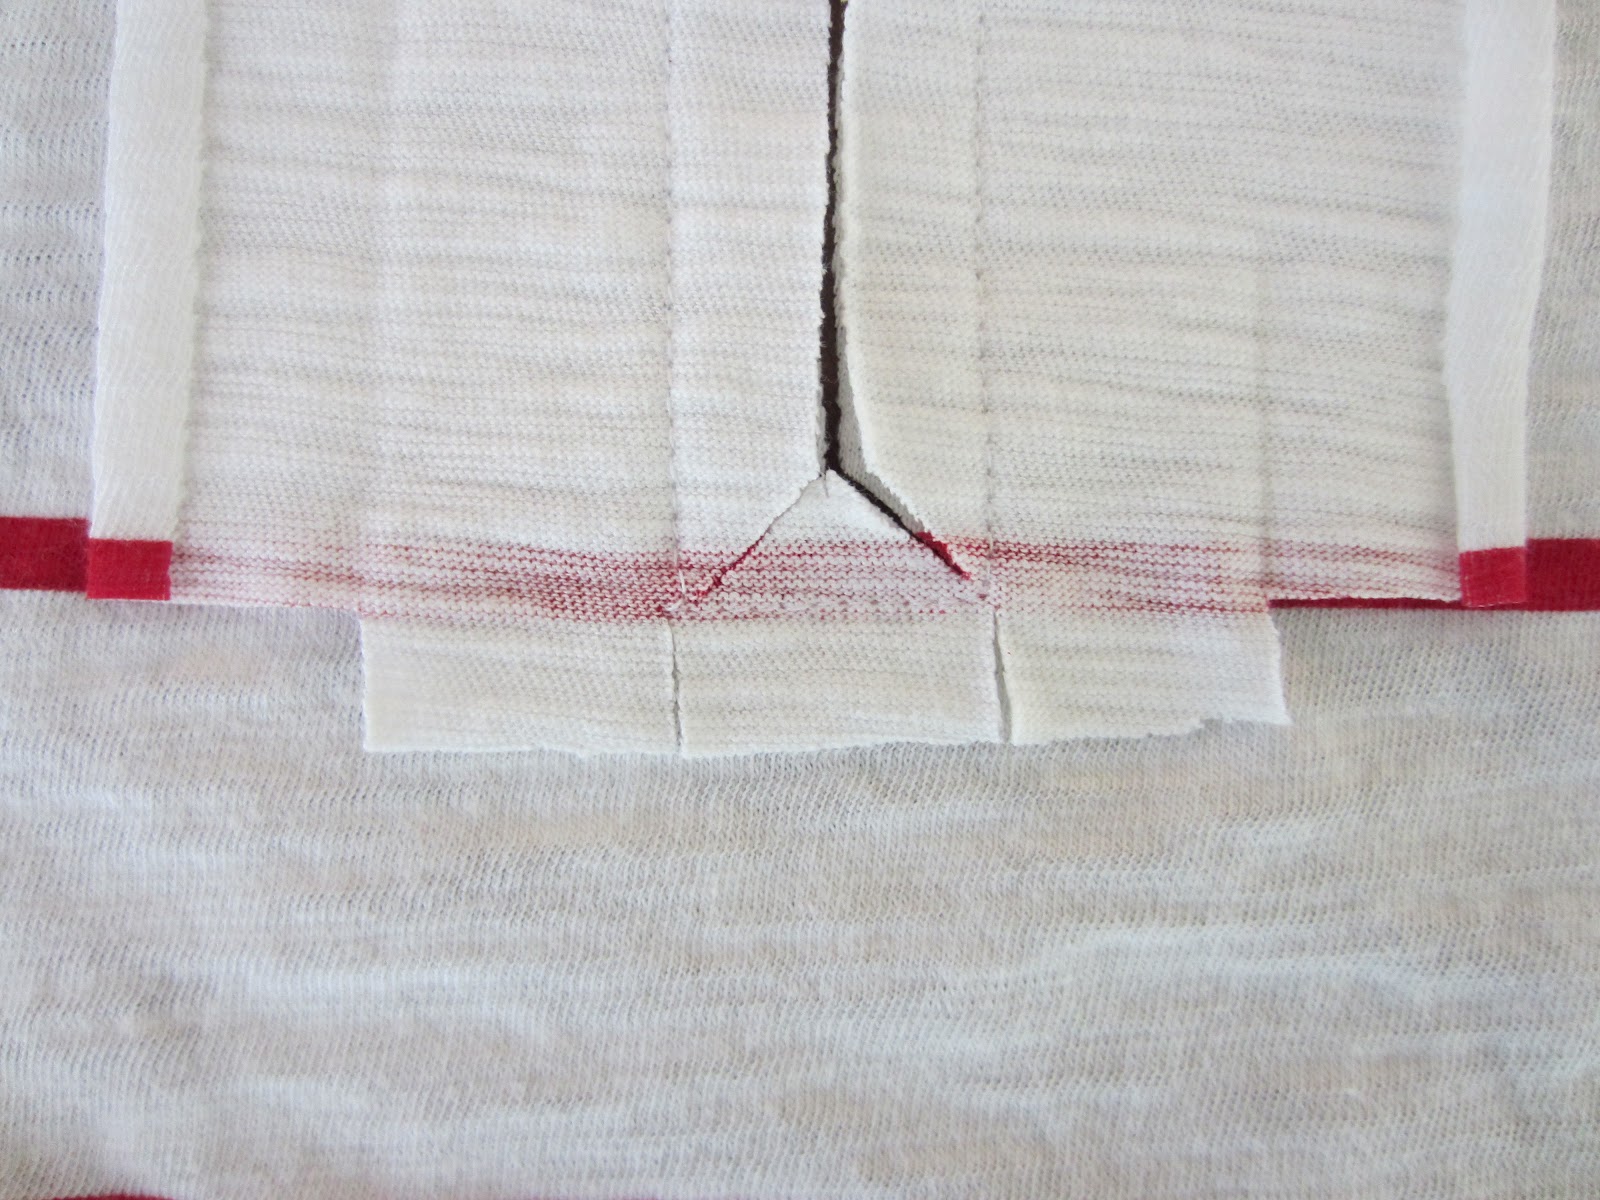
*Sew on creases around the center segment, staying ½ inch from the bottom of the placket. Now cut from the neckline down the central crease and out to each corner of your sewn rectangle in a Y shape (as close to stitches as possible without cutting through them).


*With measuring tape in hand, snip 1/2 inch slits from the bottom of the placket (NOT cutting shirt) up to the sewn line but NOT through it. Also, snip 1 inch by 1/2 inch rectangles out of each corner, as shown. Press the 1/2 inch "flaps" up toward the placket.


Folding and Finishing 


**NOTES:
1) We are making a right over left placket for boys wear, gals traditionally button left over right. Just do these in the opposite order if sewing for a gal.
2) If you are working with thin fabric, now is the time to iron on some fusible interfacing. I used a one inch strip of lightweight on each side and it worked well.

*Working on the inside right of the garment, fold the placket to the inside, hiding two of the 1/2 inch flaps and triangle shape inside. Pressing as you go and/or using a fabric gluestick can help with this step (especially if you are trying to match a print). The goal is to hide all raw edges. Play around with this step until it lays nice and smooth. Pin securely.


*Turn to the right side to check placement and topstitch along the bottom and outside edge. When sewing on the right side, make sure that you're sewing through the placket on the inside as well.


*Turn back to the inside of the garment to finish the left side of placket. Press 1/2 inch flap up and fold the placket around raw edges. (you can see the interfacing here, it slightly covers one of my creases, but it's still clear on the other side)


*Pin in place and turn to the right side to check placement and topstitch along outside long edge, keep a pin across the bottom of the placket (This side will still be free floating, we will overlap and sew the two flaps together AFTER making buttonholes).


*Measure, mark and sew buttonholes. I made three, 17 mm buttonholes.


*When that's finished, we can overlap folds and topstitch. I sewed in a 1/4 inch wide rectangle across the bottom, forward and backstitching securely.


*Mark placement and sew on the buttons. Looky there! A fully functional button placket!!


I have a feeling I'll be going "BUTTON PLACKET CRAZY" from now on! Love those fun details!

Tuesday, April 3, 2012

Aden and Anais Swaddlers Tutorial


I'm departing for one day from Easter week and sharing a project. It's that time of year when everybody starts having babies and baby showers, so I feel like there's always a long list of gifts to pick up or make. I really enjoy doing baby gifts, I like to give things that are going to be pretty but practical so that they'll be used and loved on.

One of my top five favorite baby items when I first had P were those gorgeous Aden and Anais muslin swaddle blankets. They are huge and soft and sheer. They're perfect as sunshades for babies in the summer because they stay cool and they're a good size for nursing covers. Lots of boutique stores (and Buy Buy Baby) carry most of the prints, there are stripes, animals, polka dots, cupcakes... I really recommend them for a baby gift if you need one! Target carries a limited selection of prints for a significantly discounted price. Speaking of the price, they are a little steep. I figured, "How hard can it be to find this soft, natural muslin?" Well, the answer is pretty hard. I have not been able to find the exact quality, texture and softness of those blankets!

The closest thing that I've found is cotton gauze. You'll see it out now that the weather is warming up, I picked some up at Joann's for $6.99/yd in the apparel fabrics. There were quite a few bright solids and white, of course. The white was by far the softest so I chose that for my baby blankets. I'm thinking that the more it's washed and worn the softer it will get.


Each blanket takes 1 1/4 yard. I wanted two so I bought 2 1/2 yards; washed, dried and ironed it; trimmed off the selvages, split the piece in half and squared everything up. I found that snipping and ripping was the best way to get a straight line since this fabric is kind of wavy and stretchy.  Then just go to the ironing board (get yourself a nice book on tape or something) and start pressing the raw edges under 1/4 inch then under another 1/4 for the hem. (I did not miter the corners.) Next just sew around the edges with matching or contrast thread!


Now for the fun part! I wanted patterns similar to the Aden and Anais blankets so I busted out the trusty Tulip Soft Fabric Paint in matte, some foam stamps I picked up at Hobby Lobby a couple years ago ($1.99-99 cents for a sheet), and some cheap foam brushes. My dear friend, H, is having a boy so I decided to do animals on one and transportation on the other--you know, boy stuff!


I covered my coffee table with freezer paper, squeezed some paint on a paper plate and got stamping.


TIPS:

One thin, even coat looks the best! Dab paint onto the stamp with the foam brush.

Don't rock the stamp, press firmly all the way around so you get a clear impression on the edges too.

Don't forget to mix colors if you can't find the perfect shade (or don't want to buy a million tubes of paint). I have mostly primary colors that I mix until I get what I want, but mix enough at once for the whole blanket so you don't change shades part way through.

If the stamp isn't exactly what you want, change it! I went back with a foam brush and blotted out the faces on my goofy monkey and lion so I had less cartoonish animal shapes.

Decide the 'pattern' before you start stamping, but don't stress about it! I didn't measure or anything like that, just eye it and do what looks right! For the cars and train blanket I stamped all the trains then went back and filled in with cars. The animals I did one row at a time from top to bottom and just kept changing stamps/colors with each row. I think the train/car blanket went faster.

Let the paint dry a few hours before handling, heat set with a hot iron and wait about 72 hours before washing. 


P recognized these blankets as soon as he saw them and grabbed them off my work table to snuggle! He sleeps with an Aden and Anais blanket almost every night.


Since these are hand stamped, every impression is a little different. I think that just makes them more special. They're handmade without looking home-made. Think of all the things you could do! I love the idea of getting some letter stamps and creating a print with initials or just a single initial. They can also be packaged in so many cute ways, roll them up and tie with ribbon, maybe tie a small toy on top or stuff them in a basket with other baby goodies. You could even gift a baby book along with blankets decorated with colors and images from the book. Wouldn't a set of Goodnight Moon or Hungry Catterpillar blankets be awesome! Can't wait to make more!


Tuesday, February 7, 2012

Boy Belt in a Snap Tutorial


Since P has gotten a little bigger and is wearing more pants with beltloops, I've been wanting to make him a belt. Toddler size belts are in limited supply out there. The other day, I noticed this one of my husband's, it gave me a few ideas.

Palmetto Navy and White Belt
Source

You've probably seen belts like this, made of simple woven cotton belting covered with fabric and sometimes sports insignias. I thought it would be a relatively easy thing to reproduce with some neat variations to make it a little more young and fun. I went with a striped, linen look fabric, but it would also be really fun to use a bright print, embroider designs or use fabric paint to stamp or stencil.


I've included two different 'routes' in this tutorial. Both are very quick, less than an hour, but one is much simpler and the other is a little more involved. Either way, you'll end up with a great toddler belt that no one will believe you made!


Here's what you need:

Notes:
     *If you want to take the simpler method, use two, one inch d-rings and no snaps.
       If you want snaps, also pick up some gel super glue or liquid stitches.
     *I used one inch wide belting, you could go a little wider for an older child (with
       bigger pants ;).
     *I just realized the picture below could be a bit confusing, the cardstock is three
      quarters of an inch wide and for the belting length take your child's waist plus 5 or
      6 inches.


Prepping the Fabric
Take the fabric for the belt front and back and the cardstock strip to your ironing board. (P.S. If you're going to be using the snaps, choose a fairly thin cloth, mine is really thin, linen-look. I only needed 1/8 yd). Center the cardstock on the fabric, fold the edges over and iron.


Do this for both pieces of fabric, now you have two lovely, straight strips of single fold bias tape (although it's not cut on the bias) that are exactly 3/4" wide.


(Sooo...obviously what I should be sewing is a new ironing board cover...)

Attaching Fabric to Belting:
Take the shorter piece of fabric, starting at one end of the belting, center the fabric and pin in place.


Set your machine to a dense zig-zag and stitch across the raw end as shown. (I tucked the sides in a little so that the stitches will be hidden behind the fabric on the other side.)


Return to a straight stitch and edgestitch all the way around the shorter fabric piece, attaching it to belting. Next, take the longer fabric strip, center and pin in place on the other side of the belt. Sew around the edges. Trim ends if needed.


End Tab:
Now grab your 2" x 2" square, it's going to be a tab to cover the raw end of the belt that has fabric on both sides.


OK! If you are taking the simple route, this is your last step!! If you are going it the other way, you're almost to the tricky part :).

SIMPLE ROUTE (D-Ring Belt Buckle):
Thread the raw end of the belt through TWO one inch d-rings (photo below only shows one, but they're attached the same way).  Fold the raw end under and sew across the fold, forward and backstitching securely. That's it! You have a cool, grown up boy belt with tons of easy variations. Different colored belting, bright fabrics, you name it! To fasten, thread tabbed end through both d-rings, then (reverse direction) around the first d-ring and through the second. Easy to adjust and it keeps those pants up around the waist instead of the knees!

SNAP CLOSURE ROUTE:
Attach ONE one inch d-ring to the raw end of the belt, shown below. On to the next step!

(Ignore the fact that I started out using a 1 1/4" d-ring here)

SNAP PLACEMENT:
I recommend starting with one snap stud and decorative prong cap on the tabbed end of the belt. The side with the shorter piece of fabric is what will show when the belt is pulled through the d-ring then back over itself to snap closed. So the decorative side will be on the shorter piece of fabric. Go ahead and set this snap. (See my tips for snap setting further down the page).


Now, try the belt on your child, while he is wearing a pair of pants with belt loops. Pull the end until it fits, make a mark where the snap socket side should go (this is going to be the tightest setting on your belt). Go ahead and set the socket snap in place

Where you add the other snap sockets so that the belt has adjustable lengths is up to you, tape them in place then experiment before you set them. I used decorative prong caps (with sockets or studs) anywhere that they would show. I like the look of them across the front of the belt.


*The bottom belt was my first sample, see how the Dritz snap setter indented the cap? I like the top belt better, using matching prong caps where they show turned out nicer.


Snap Setting Tips:
1) Don't try to use the Dritz snap setter recommended for size 24 snaps. It only works for one side and bends up the snaps horribly. Go with the spool of thread/hammer method described on the snap packaging. I found that if I started with light taps as I rotated the spool of thread (the snap is only in contact with those four plastic spokes) the snap closed more evenly and securely. Then several hard taps, still rotating the spool.

2)  The snaps are the part I love most from my original idea/sketches of this belt, they look so cool and industrial. BUT...there are a few limitations and endless variations on snap placement. The problem arises when a snap hits squarely at the d-ring. There are ways around it, but it limits the adjustability of your belt (this is a little hard to explain until you start fiddling around with snap placement, you'll see what I mean). If you decide to depart from my recommendations below, definitely tape them in place and experiment before you do anything permanent.

3) The belting is quite thick, but the snaps go through it pretty well. Thin fabric helps, but I had some snaps pull out of my first belt trial. After adding a few little dabs of super glue to the prongs, they worked perfectly. The gel is good because it doesn't bleed.


Rather than setting all the snaps at once, you could just add snaps as your child grows...although I could see myself doing that and having a Sunday morning that goes a little something like this :

Husband: "Are you ready yet?"
Me: "Yes, just one second, where's the hammer?"
Husband: "Hammer, what are you doing? We're going to be late and P's pants are falling down."
Me: "I. Know. That. Just get in the car, I'll be right there."


So cute! I'm going to have fun experimenting with patterns and colors. This could be a great women's belt as well!

P.S. If you make one, let me know how it went. Leave comments or add photos to the Flickr pool, "You Sewed!"

(I was browsing Elsie Marley's tutorials and saw she posted a really similar belt for boys on her site. I swear, I think the third belt down in the first photo is the same fabric! I like her solution to the snaps...)