Thursday, August 23, 2012

Just Livin' Life

So for my blog, I usually share sewing projects and crafts and such--mixed in with a little bit of "being a mama." A friend, who shall remain nameless, recently asked me to post more about life and what's going on with the fam. A really good idea since I'm giant and I haven't been physically able lately to crawl around on the floor and cut out pattern pieces, but life is definitely moving on!


Here's P getting to know one of his newest buddies. He calls him "Wee-oh." That is not his name.

P was super sweet with the little man, he even shared one of his favorite toys, a solid metal tractor. Did I mention that he chucked it across the room  at  to him? No? Well...

Still, it gives me hope that when new baby gets here, P will be gentle and nurturing...as much as 2 year olds are able. Laying down beside rather than stepping upon a small baby is a great starting point!


My poor Dad (who has never been injured a day in his life) tore something in or around his achilles tendon. This meant a small operation, cast, boot, elevated leg, crutches, a scooter to keep him from weight bearing and my Mom's presence to keep him from doing things like re-shingling the roof while recuperating. We were all able to go out on the boat for a while this weekend. In this photo, P had just been instructing Grampa to "Share" the steering wheel... at least he gets the concept.


We've done a good bit of swimming this summer, it's fun to see P getting more comfortable in the water. He will even put his face partly underwater and blow bubbles!


This is possibly one of my favorite pictures of the year! The cousins together and all smiling, seems too good to be true!


One of my other favorite things: P learning to talk. He's very literal.

Duck=Quack (Photo below is P with his new friend 'Quack,' whom my Mom found at an antique store. He weighs about 20 pounds and has a brass beak. Cuddly.)

Monkey=Ooh Ah Ah

Horse=Neigh (This one sounds particularly realistic.)

Dog=Woos

Swings/Slides= Wee!

Car=Ride (He calls my car "Mama Ride," my husband wants to get me a personalized license plate. I said no.)

I love you/Where are you? = "Ah wah oo!"/"Ah wah oo?" (yes, they are the same)

Fork/Frog: F***

"No barking, Leo."= "No bahkin', Wee-oh!" (He's never heard me say this.)

That's enough for now! Hope you're having a good day!


Thursday, August 16, 2012

Knitathon: Chevron Baby Blanket

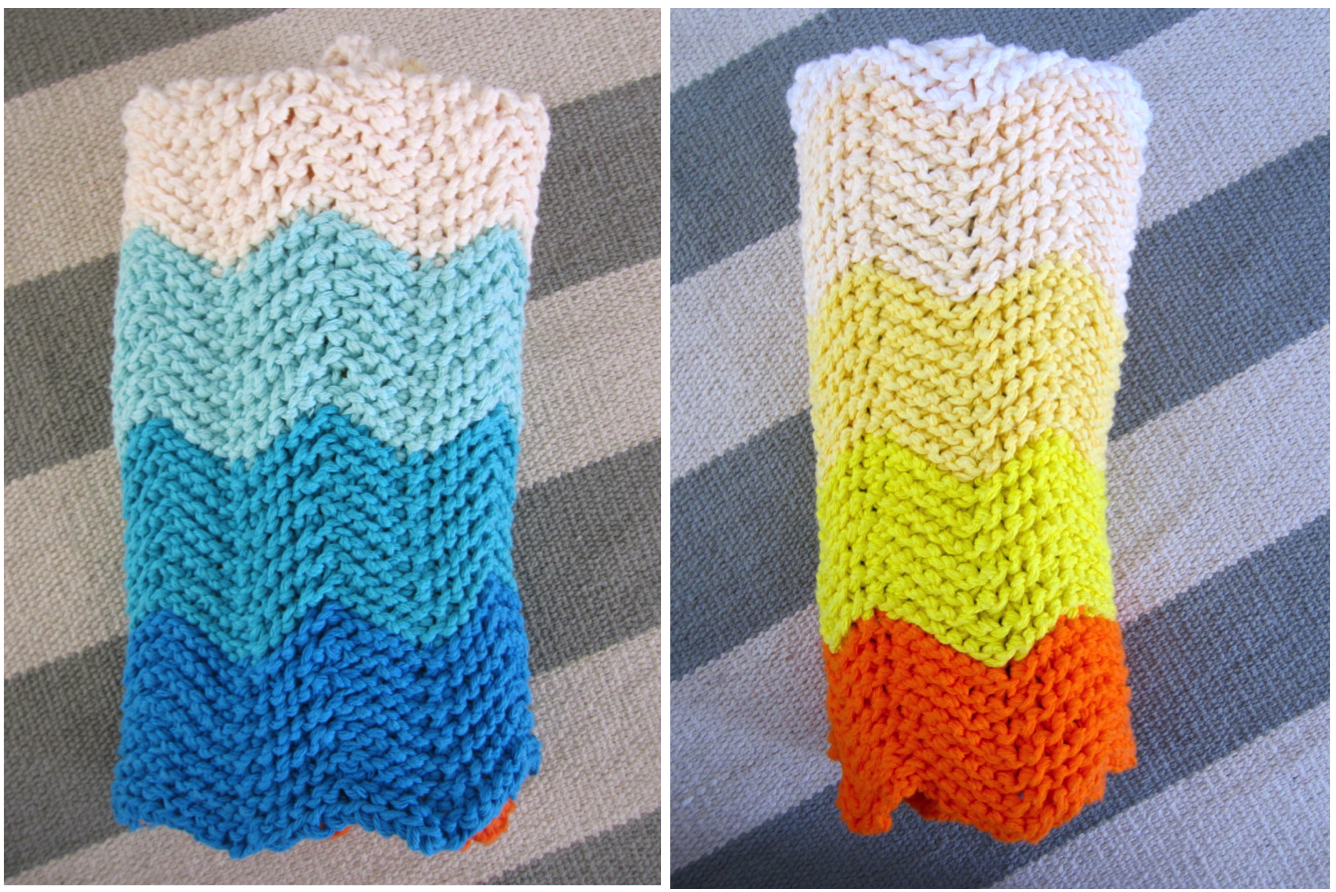
I finally finished my chevron blanket for the new baby! It actually didn't take that long to knit, but I was scared of binding off so it sat around with one row missing for about 2 months. This fear turned out to be totally unfounded, binding off was a snap!

AND!! I love it! The cotton feels so thick and luxurious.


The colors are so vibrant, especially with the combo of cool colors and warm colors...it's got a little ombre thing going, I think :)


Does this remind anyone else of a sunrise? With the bright orange sun peeking over a serene ocean of blues with white capped waves...


Ok, ok, I'll stop. But really, learn to knit and go make this blanket. You, your baby or the recipient (if you make it for a gift) will be thrilled with the results! 


Wednesday, August 8, 2012

Update

Just wanted to pop in and tell you what I've been up to! I'm feeling very blessed to be 33 weeks along today and not in the hospital! My first baby was born at 33 weeks after 8 weeks of full bedrest in the hospital. I thank the Lord every day for my friends and family and many prayers that helped us get through that long, difficult time. Still, I've had to take it very easy the past few days and the sewing has been on hold. I am, however, doing some fun planning and online shopping to get rooms for the baby and big brother squared away. I'm focusing on P's room (that's big brother) first since I'm re-using a lot of my nursery stuff. I bought 6 yards of fabric (Woot woot) in some great colors and prints, with plans for a twin sized blanket and for accent piping/edging for sheets and curtains. Here's one of the fabrics that I ordered from Etsy. Is anyone NOT obsessed with bunting and woodland creatures these days?! I love the grays and orangey reds.


This rug for P's room came yesterday:


Love, love! If you're interested, it came from HERE. I will tell you it looks a little darker gray in real life and since it's woven cotton definitely order a thick rug pad (not just a no-slip deal). I suggest overstock.com for things of that nature, much cheaper and really great shipping prices. I was really luck and the delivery man brought both at once! 

I'll be back soon with some photos of the real thing and hopefully some tutorials on making purchased items like plain sheets and curtains really unique and personalized. Although...baby's plans and my plans don't always line up. Isn't that how life goes? Stay tuned!


Thursday, August 2, 2012

Come Visit...

I shared a few weeks ago that I would be guest posting for Boy, Oh Boy, Oh Boy and Melly Sews for their "Sew in Tune" series. It's been really fun to see what all these creative Mamas have come up with so far and great to get some new ideas for boy projects. If you haven't already been following, take a look! My post is going up over at Boy, Oh Boy, Oh Boy this morning! Check it out, P and I had a lot of fun with this...there may even be a super simple, summer recipe involved.

Thursday, July 26, 2012

Tutorial: Tribal Print Denim Shorts

Have you seen these denim cutoffs with tribal print panels added? They're all over Pinterest.

Free People


Free People Rodeo Shorts

Cute right!? Some have a panel in the front and also a contrasting strip on the back yoke. My sister asked me to make a pair for her out of some cast off jeans so I thought I'd take some photos and share. It was a pretty quick project, here's how: 

You Need: 
Shorts (hemmed or frayed)
small pieces of fabric (cotton, knit, poly, etc... just be sure that it can take a little heat)
small pieces of Pellon "Wonder Web" (this is great stuff, it's over by the interfacing)
matching thread, scissors, iron, denim needle, stitch ripper, etc...

The Steps: 
1) Start by using a stitch ripper to remove stitches from the bottom of the belt loops (I did all of them so that I could sew them back on with black thread instead of taupe, just a time saver :)


2) Use the wonder web to create a template for each of the fabric pieces. Cut them so that they fit perfectly within the area you want to cover with fabric. We will add some allowance for hems in the next step. (You can see here I started with two separate pieces in the back but that really wasn't necessary)


3) Lay the wonder web on your fabric of choice; using it as a template, cut around the pieces adding a 1/4 " hem allowance on all sides. 


4) Head to the ironing board and pin wonder web to the wrong side of the newly cut pattern pieces. Snip corners off diagonally to reduce bulk then begin folding the fabric around the wonder web and pressing it down with a hot iron. (See photos) Avoid touching the web with your iron or you'll have a sticky mess. 


Snip wherever necessary to manipulate the fabric around the "wonder web template." The center bottom of the yoke (below) needs a snip to keep the correct angle and make a row of snips around the curve of the pocket for the front panel. 


5) When you're finished pressing, pin the pieces to the shorts. Use lots of pins and be prepared to pull and tuck so that the pieces fit correctly. (WAIT UNTIL AFTER SEWING TO PRESS, that gives you the chance to shift the fabric around and avoid weird wrinkles.)


6) Sewing with matching thread, stitch as close to the edge of the fabric as possible, smoothing as you go and keeping the belt loops out of the way.


 When you apply the front panel, finagle your way inside the pocket so that you don't stitch it closed, then sew around the outside edges.


7) After you finish stitching, press the shorts, heating wonder web and fusing the fabric even more securely to the shorts.


8) Last step! Sew the belt loops back in place. Done! A trendy, easy, upcycle!


As soon as I get one, I'll add a picture of my sis modeling these! I would have tried them on myself...but...the effect (considering my 7 month pregnant belly) wouldn't have been exactly the same :).

By the way, this fabric is a $1/yd remnant from Hancocks. It feels like rayon but is probably some other kind of cotton/poly blend because it ironed just fine. I think the light weight helped keep these shorts from feeling too bulky. 

Friday, July 20, 2012

"Tie-in'-It-Up" Tee

Back in April a good college friend, whom I don't get to see nearly often enough :), emailed and asked me to make a t-shirt with an appliqué tie on the front for her little man's first birthday party. I have seen these everywhere...bibs with ties, tee's and onesies with ties, you name it...but I've never made one myself. So I was excited to do it. I found an inexpensive 18-24 month tee at Old Navy, it had a chest pocket but I removed that before pre-washing and drying. You can't even see where it was.

This is a quick and easy project!

Here's what you need: 
Tee, onesie, bib, etc...
small piece of cotton fabric (woven or knit is fine, just make sure it's washable)
lightweight and medium weight fusible interfacing
chalk or disappearing ink pen
pins, thread, sewing machine, scissors


1) First decide on the size and shape of your tie. This is personal preference. Fatter and shorter makes it look more "cartoonish," my friend specifically requested a more narrow, realistic tie. Practice on tissue paper until you get what you want, keep it proportional to the garment you are working with. Also, be sure that when you cut it out, that the left and right sides are symmetrical.

2) Back the tie with lightweight fusible interfacing and press a strip of medium weight inside the shirt. Position the tie and pin securely. Set your machine to a dense, wide zig-zag stitch (I used 0.8 density and between 2.8 and 3.0 width) and turn the thread tension down a bit (I used 3). See my "Tips and Tricks to Applique." Careful not to stretch the tee as you sew, sew the tie to the shirt.


3) Peel away and trim off as much of the medium weight interfacing as possible from the inside of the shirt (I find it makes the shirt feel a bit stiff if left on). Press with a little steam if you have any funny wrinkles. That's it! Enjoy!


Even better when it's adorning an adorable chunk of baby boy! Happy birthday little guy!


Thursday, July 19, 2012

Tutorial: Simple Button Placket


This week I’ve been drafting a pattern for a new outfit for P. I’m really excited about it and will be sharing more later, but for now I’m going to show you how to sew a simple button placket that works for any top made from a single pattern piece for the front and a single pattern piece for the back –a good example would be a plain ‘ol t-shirt. It’s easy and a little different to make button plackets when there are center seams down the front or back of a garment, in that case you just add some extra fabric for seam allowances and self-facings. This method basically creates a nice, neat looking placket around a slit at the front or back neckline.


You need:
Garment
Square or rectangle of fabric—knit or woven, matching or contrasting
Small scraps of lightweight fusible interfacing
Buttons
Matching thread/sewing machine
Iron/ironing board

 *First decide on the size of your placket. Mine (finished size) is 5 inches long and 1 inch wide. To determine what size rectangle you need, add ½ inch to your desired length then multiply desired width by 5 and add ½ inch. My rectangle is 5 ½ by 5 ½ inches. 

Pressing and Preparing the Placket

*Working on the wrong side, press the side edges in ¼ inch (along the length).


*Next fold the edges in one inch and press.


*Fold both sides in again (careful to measure 1 inch) and press. When unfolded your rectangle should be creased like this (these are important and will help guide the later steps). Not counting the ¼ fold on each side, you should have 5 equal segments (each the desired width of finished placket), one inch in my case. 


*Now fold the rectangle in half (matching edges of ¼ folds) and press along folded edge so that the center segment is divided in half.


Attaching Placket to the Garment

*Unfold and match this center crease to the center of your garment’s neckline with right sides together, pin in place. Use disappearing ink or a pin to mark ½ inch above the bottom of the placket.


*Sew on creases around the center segment, staying ½ inch from the bottom of the placket. Now cut from the neckline down the central crease and out to each corner of your sewn rectangle in a Y shape (as close to stitches as possible without cutting through them).


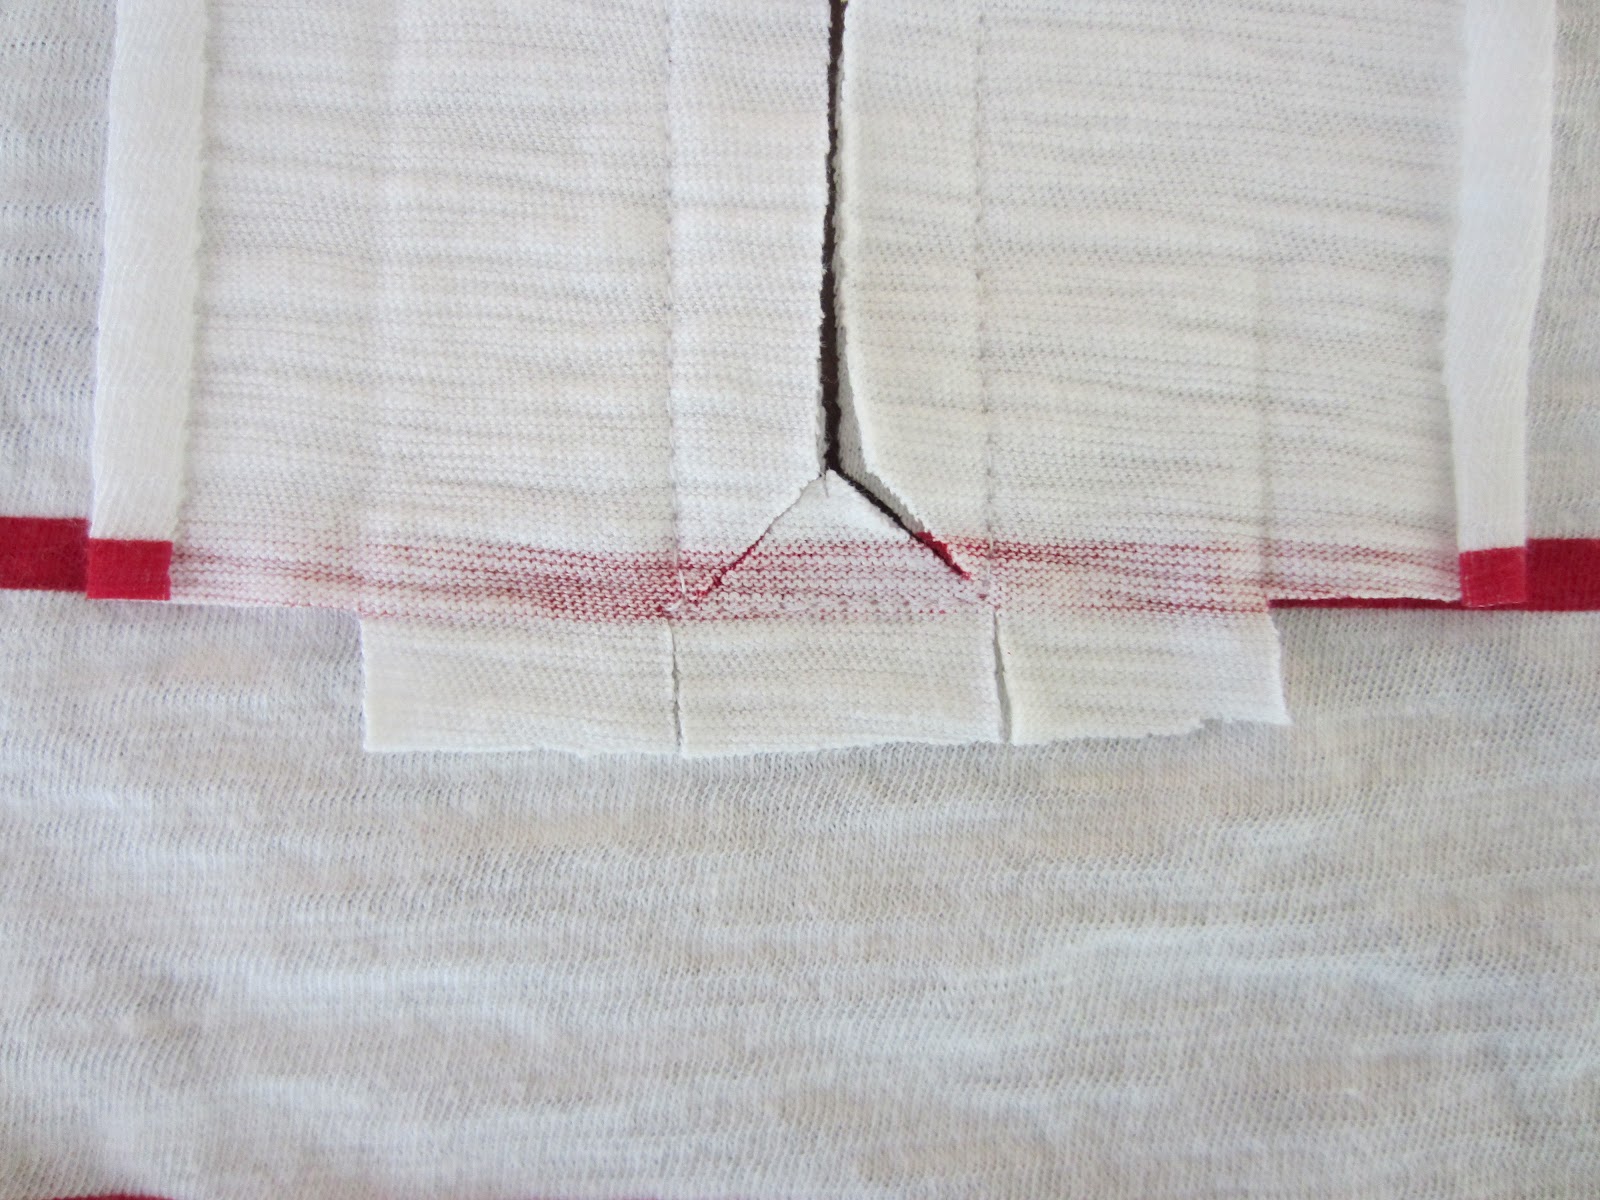
*With measuring tape in hand, snip 1/2 inch slits from the bottom of the placket (NOT cutting shirt) up to the sewn line but NOT through it. Also, snip 1 inch by 1/2 inch rectangles out of each corner, as shown. Press the 1/2 inch "flaps" up toward the placket.


Folding and Finishing 


**NOTES:
1) We are making a right over left placket for boys wear, gals traditionally button left over right. Just do these in the opposite order if sewing for a gal.
2) If you are working with thin fabric, now is the time to iron on some fusible interfacing. I used a one inch strip of lightweight on each side and it worked well.

*Working on the inside right of the garment, fold the placket to the inside, hiding two of the 1/2 inch flaps and triangle shape inside. Pressing as you go and/or using a fabric gluestick can help with this step (especially if you are trying to match a print). The goal is to hide all raw edges. Play around with this step until it lays nice and smooth. Pin securely.


*Turn to the right side to check placement and topstitch along the bottom and outside edge. When sewing on the right side, make sure that you're sewing through the placket on the inside as well.


*Turn back to the inside of the garment to finish the left side of placket. Press 1/2 inch flap up and fold the placket around raw edges. (you can see the interfacing here, it slightly covers one of my creases, but it's still clear on the other side)


*Pin in place and turn to the right side to check placement and topstitch along outside long edge, keep a pin across the bottom of the placket (This side will still be free floating, we will overlap and sew the two flaps together AFTER making buttonholes).


*Measure, mark and sew buttonholes. I made three, 17 mm buttonholes.


*When that's finished, we can overlap folds and topstitch. I sewed in a 1/4 inch wide rectangle across the bottom, forward and backstitching securely.


*Mark placement and sew on the buttons. Looky there! A fully functional button placket!!


I have a feeling I'll be going "BUTTON PLACKET CRAZY" from now on! Love those fun details!