

This week I’ve been drafting a pattern for a new outfit for P. I’m really excited about it and will be sharing more later, but for now I’m going to show you how to sew a simple button placket that works for any top made from a single pattern piece for the front and a single pattern piece for the back –a good example would be a plain ‘ol t-shirt. It’s easy and a little different to make button plackets when there are center seams down the front or back of a garment, in that case you just add some extra fabric for seam allowances and self-facings. This method basically creates a nice, neat looking placket around a slit at the front or back neckline.
You need:
Garment
Square or rectangle of fabric—knit or woven, matching or contrasting
Small scraps of lightweight fusible interfacing
Small scraps of lightweight fusible interfacing
Buttons
Matching thread/sewing machineIron/ironing board
Pressing and Preparing the Placket
*Working on the wrong side, press the side edges in ¼ inch (along the length).

*Next fold the edges in one inch and press.

*Fold both sides in again (careful to measure 1 inch) and press. When unfolded your rectangle should be creased like this (these are important and will help guide the later steps). Not counting the ¼ fold on each side, you should have 5 equal segments (each the desired width of finished placket), one inch in my case.

*Now fold the rectangle in half (matching edges of ¼ folds) and press along folded edge so that the center segment is divided in half.

Attaching Placket to the Garment
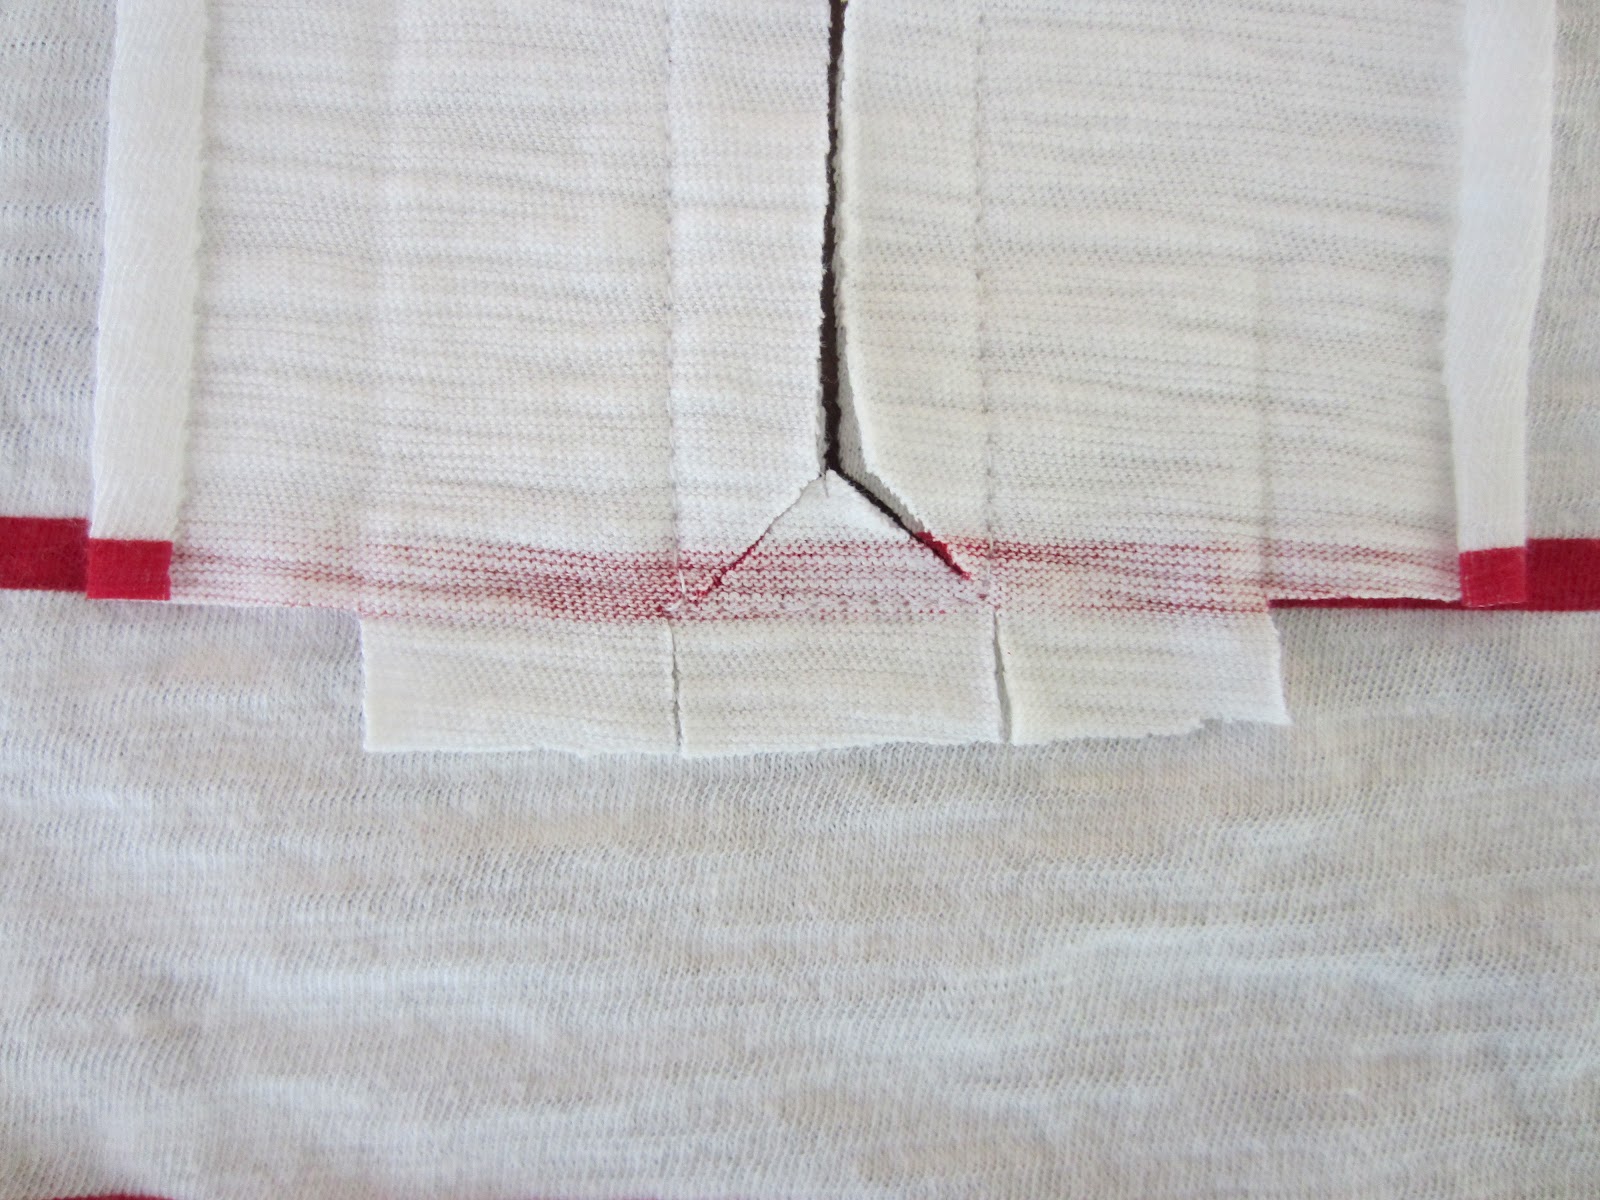
*Unfold and match this center crease to the center of your garment’s neckline with right sides together, pin in place. Use disappearing ink or a pin to mark ½ inch above the bottom of the placket.

*Sew on creases around the center segment, staying ½ inch from the bottom of the placket. Now cut from the neckline down the central crease and out to each corner of your sewn rectangle in a Y shape (as close to stitches as possible without cutting through them).

*With measuring tape in hand, snip 1/2 inch slits from the bottom of the placket (NOT cutting shirt) up to the sewn line but NOT through it. Also, snip 1 inch by 1/2 inch rectangles out of each corner, as shown. Press the 1/2 inch "flaps" up toward the placket.
Folding and Finishing
**NOTES:
1) We are making a right over left placket for boys wear, gals traditionally button left over right. Just do these in the opposite order if sewing for a gal.
2) If you are working with thin fabric, now is the time to iron on some fusible interfacing. I used a one inch strip of lightweight on each side and it worked well.
*Working on the inside right of the garment, fold the placket to the inside, hiding two of the 1/2 inch flaps and triangle shape inside. Pressing as you go and/or using a fabric gluestick can help with this step (especially if you are trying to match a print). The goal is to hide all raw edges. Play around with this step until it lays nice and smooth. Pin securely.


*Turn to the right side to check placement and topstitch along the bottom and outside edge. When sewing on the right side, make sure that you're sewing through the placket on the inside as well.

*Turn back to the inside of the garment to finish the left side of placket. Press 1/2 inch flap up and fold the placket around raw edges. (you can see the interfacing here, it slightly covers one of my creases, but it's still clear on the other side)

*Pin in place and turn to the right side to check placement and topstitch along outside long edge, keep a pin across the bottom of the placket (This side will still be free floating, we will overlap and sew the two flaps together AFTER making buttonholes).

*Measure, mark and sew buttonholes. I made three, 17 mm buttonholes.

*When that's finished, we can overlap folds and topstitch. I sewed in a 1/4 inch wide rectangle across the bottom, forward and backstitching securely.

*Mark placement and sew on the buttons. Looky there! A fully functional button placket!!

I have a feeling I'll be going "BUTTON PLACKET CRAZY" from now on! Love those fun details!
Great tutorial! Thanks! I've pinned it :)
ReplyDeleteWonderful tutorial! Thank you. I am gearing up to try this for the first time!!
ReplyDeleteThanks so much for this tutorial. I've used it a couple of times, once on a store bought sweatshirt to make room for my lil guy's head, and again on a t-shirt that I made. This was so easy to understand and replicate! I'm a novice seamstress, and your photos and directions helped so much!
ReplyDeleteSo do you just not worry about the raw edge on the inside at the bottom? Or did I miss a way to finish that edge?
ReplyDeleteThanks for the great tutorial!
Hi Melanie, you're right, the fold to the inside is raw along the bottom edge. WIth knits, you don't need to worry about fraying. If you're sewing with something prone to fray, you could serge or zig zag stitch that raw edge before attaching the placket, but it's probably not necessary. If you start looking inside purchased clothing you'll see something similar.
DeleteI just came back to this page (gratefully I had bookmarked it) to follow your helpful tutorial once again, so thanks for your answer here!
DeleteThis is so helpful! Thank you!
ReplyDeleteI know this is quite old but thank you so much for this tutorial! I've always thought making these are so difficult but you've made it so easy for me :)
ReplyDelete