Tuesday, April 24, 2012

Easy Tunic Style Top Tutorial

I cannot stand to wear maternity clothes that look like all I've done is draped a tent over myself, you'd be surprised how many things look like this, especially dresses. I need some summery tops so I decided to create a simple pattern and make one. I used this beautiful, sheer, navy and white polka dot cotton/poly knit that I picked up on the Hancock's discount table several months ago ($1/yd, score!!)

Here's a snapshot of me wearing my version (without the belt, which I'm adding in this tutorial). It's cropped like that because I entered it in Made by Rae's Spring Top Week competition.


I love how it turned out, it's super easy and comfy and there are so many ways you can vary or alter the pattern to fit your body and your style.

Here's what you need: 
1) 1-2 Yards of fabric (I used something with a little stretch to accomodate the baby bump, but it would also be really pretty in a silky fabric or nice cotton)

2) Matching thread

3) measuring tape, scissors, sewing machine, etc...


How to:
1) First cut 1 rectangle:
    width=across shoulders from sleeve to sleeve plus hem
              allowance
    length=shoulder to bottom of shirt plus hem (cut on fold)

The shape of this shirt is basically a rectangle, folded in half with an opening for your head (then sewn up on the sides of course). Hold your arms straight out to your sides (like you are about to do arm circles, remember elementary school PE?) and measure from elbow to elbow across your shoulders and upper arms. If you want shorter sleeves like mine, just measure in the same way but starting and stopping where you want the sleeves to hit. Take this measurement and add 2 inches. For the length, measure from your shoulder to just below your hip (or desired length) and add 1 inch (we're going to cut on the fold so this measurement is actually half the total length of your rectangle). I did this measurement on my front so I could add in a little bust and belly room.

(At this point, I went to the ironing board and pressed all edges under 1/2" then another 1/2" and hemmed the rectangle all the way around. I didn't do anything fancy for the corners.)


2) Now we are going to cut out the neckline hole and make bias tape to finish the edge. Grab a shirt to use as a guide. I like a v-neck, but boat neck or round neck or whatever would also look good.

Start with the gentle curve of the back neckline, cut through both layers, then adjust the front until you have what you want.


Next, cut a strip of fabric (about 1 3/4" wide, I was using a 1" bias tape maker) long enough to line the edge of the neck opening. I did not cut my strip on the bias, it's up to you. Make your bias tape, then start pinning it in place, sandwiching it around the raw neck edge. I sewed the strip together at the center of the 'V' with a straight seam so I could hide it. Now, sew the bias tape to the shirt.


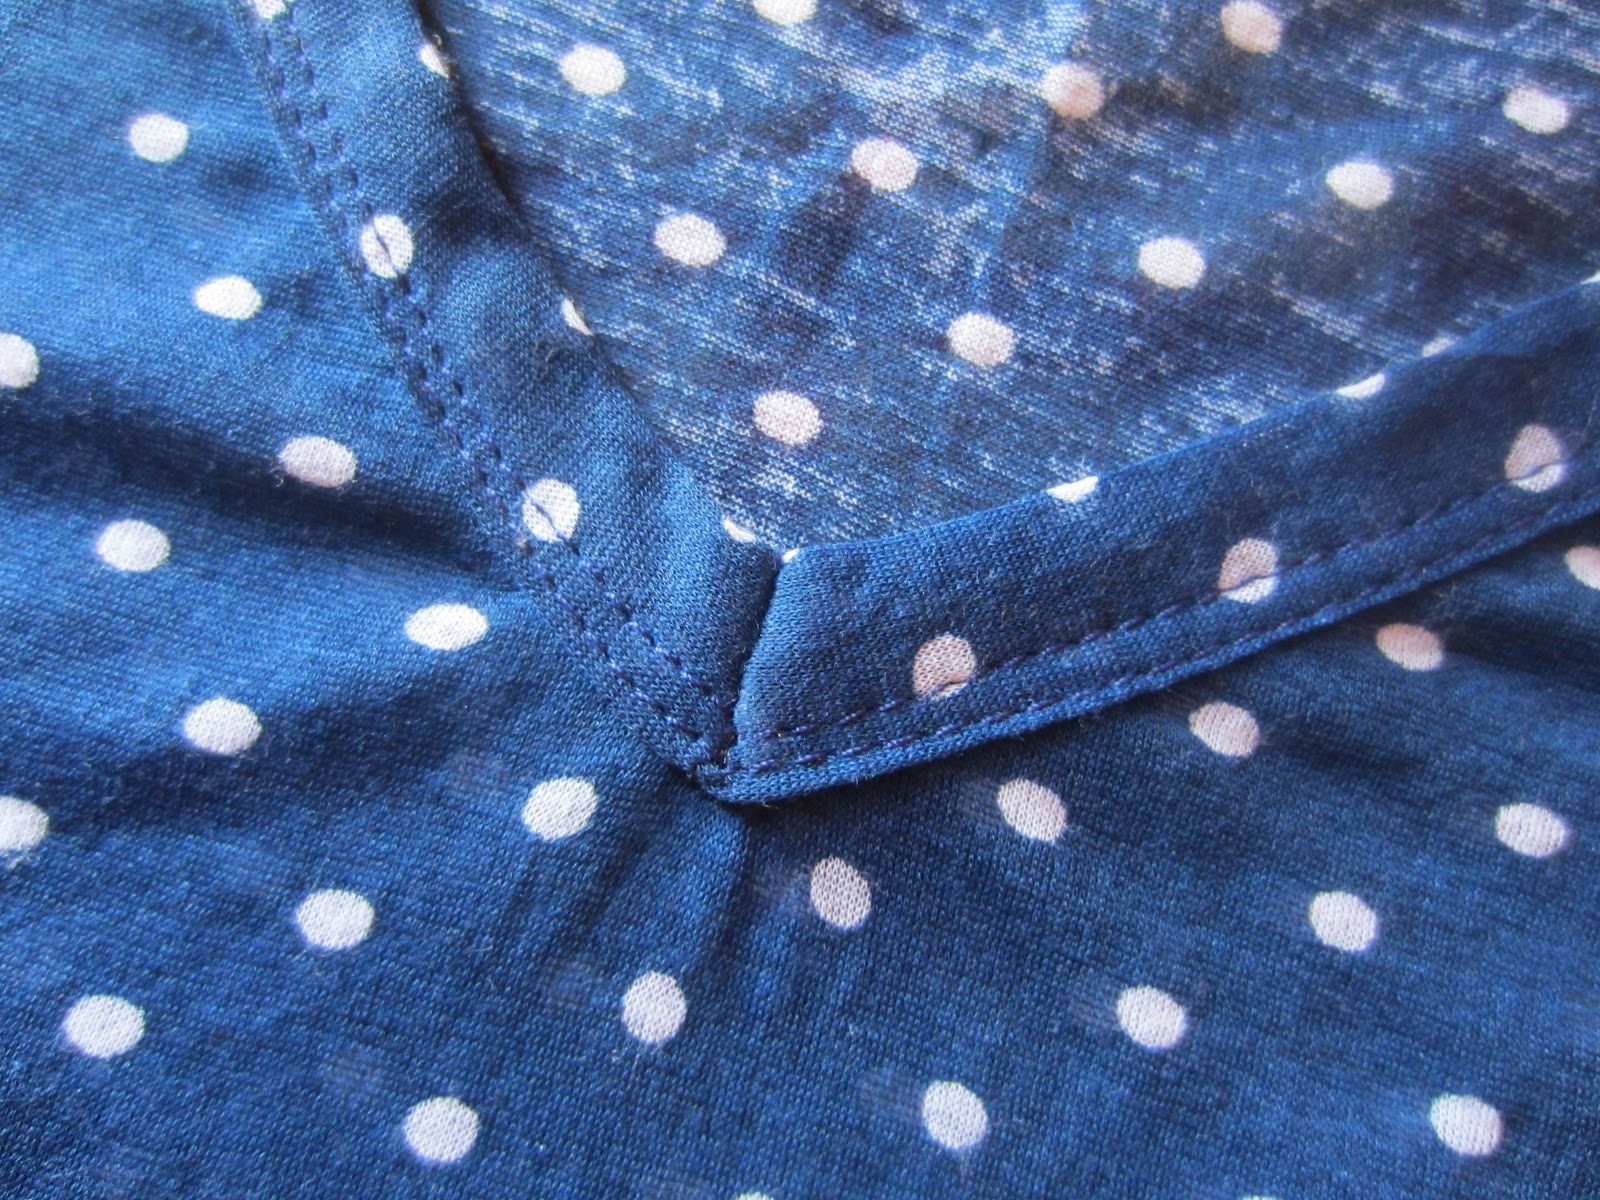
To form a nice 'V', pinch the bias tape with right sides together and sew along the crease, creating a little 'wedge.'


Beautiful!!


3) Now for the fit! Stand in front of a mirror (bring some pins!), put the shirt over your head and be sure the bottom edges match up perfectly (center the fold at the top of your shoulder). Matching side seams as you go, start at a comfortable spot under your arm and pin down the sides in a straight line. Pin close enough to your body to give you a flattering fit but with enough slack to get the top on and off easily. Use another pin to mark where you want the belt to go--it could be around your ribs if you're preggers or at the natural waist if you aren't. You can see in the picture below the outside line of pins is going to become my side seam and the inside yellow pin is where I want the belt.


Before you start sewing, measure to be sure left and right seams are in the same position and that the side edges are perfectly matched, then just sew in a straight line from the underarm to the hem on the right side of shirt-forward and backstitching securely. Repeat on the other side. Try on your shirt before going any further, make adjustments if needed and double check your belt position (measure and mark belt position on each side, right on the side seam).

4) For the belt, we're going to make buttonholes right on the side seams, that way the belt can be cinched in around your middle but leave the side ruffles 'ruffly.' Mine are 1 1/4" long, (about 25 mm on my machine). I did not reinforce the fabric with interfacing, if you use a really delicate fabric, make the holes just inside the side seam and use a small piece of interfacing (it will be completely hidden that way).


5) This is the last step! The Belt!! Cut a strip of fabric: Length= your waist (x2) and Width=3 1/2" Take the strip to the ironing board. Press the short ends under 1/2" and press one long edge under 1/2". Next fold the raw edge over about 1" and press, then match long pressed edges and press again. Now just sew along the ends and down the long, open side.  (ignore my horribly stained ironing board cover, clearly that should be my next project! :)


 That's it! Tie in the back or on the side, or wear without a belt. The buttonholes don't show at all if you do them in a matching color. This top was so easy, it was an hour project at most. I love something you can completely finish during one nap time...or one episode of Sesame Street. I will be making this again!


If you make this, I'd love to see comments or pictures (add them to the "You Sewed!" Flickr pool, click the tab at the top right of my homepage).


Friday, April 20, 2012

My Skirt Secret

So now that I'm about 17 weeks pregnant (Surprise! If you didn't know it already!) I've been on the hunt for a few new maternity things. I was teaching when pregnant with P, so I have more than I need of basic things like black pants, khakhis, plain t's, and all that. What I don't have is pretty, cool, casual everyday wear.

I saw/stalked an adorable pregnant girl at the dr's office wearing a long, flowy maxi skirt with a fitted black tank--super cute combo over a baby bump--and instantly decided that I needed that skirt as soon as humanly possible. I suspected the brand name of the one she was wearing and knew it might be exorbitantly expensive so before springing for that one, I hunted around for something comparable.

Two skirts, one cost $22 and one $99. Which do you think is the expensive one?


Ok, I'll tell you. The first skirt is Pea in the Pod and it cost $99 (if you know Pea in the Pod, $99 is actually on the lower end for them). The second is from Forever 21 for $22 (Holla!). There are some differences BUT are they $77 dollars worth of differences?! Obviously the Pea in the Pod skirt has better quality materials and I think the print is a little more chic and mod. I have to say though that the Forever 21 skirt is more comfortable, it has that wide shirred waist band which is perfect for the bump and it's actually a better length for me. I wish someone were here to photograph them on me, I think you would be more impressed with the Forever 21 version (the paisley looks a little more "BAM" in the photo than it does in real life).

So  my little skirt secret is that I'm keeping the cheap one. If this weren't maternity garb and I were looking at several seasons worth of investment, I might go with the more expensive version because I do like the print and colors best. But...for one summer of wear and since the style and feel are almost identical--I'm going with the cheaper version and treating myself to approximately 77 Strawberry Limeades from Sonic.

I've got a few maternity-wear tutorials in mind, the easiest shirt ever that would also be cute on a non-preggo gal and a pair of lace shorts (AHHH!). I've been so sad seeing all these adorable shorts everywhere that I can't sport this year, so dang it, I'm going to make some. Then I can sport some shorts too... :)


lace shorts...


Monday, April 16, 2012

Two weeks...

It's been two weeks since last I blogged.

I started to write a poem here explaining where I've been, but it was ridiculous and included the word 'snogged,' so I quickly backspaced, hopefully saving myself a little embarrassment and am now moving forward with life.

We've had visitors the past two weekends, over Easter (which was glorious and joyful, hope yours was too!) and this past weekend as well. We ate out many times, ate lots of bacon and seafood, walked around the French Quarter, visited an aquarium (to see Nemo who we call "Memo" in our house) and just had a generally good time with friends and family.

P wore a bubble romper for Easter...it was one of those projects that I felt would never end. I tore out so many stitches and resized so many times that I just wanted to dump it in the trash and start over. You know how that is? I made the 18-24 month size but it would have fit a fifteen year old so I had to cut out some width on the sides and fix that, then I forgot that there was supposed to be elastic under the arms, then I realized they were a little too long for the bubbly shape that I really wanted, the bubble sort of droops into a skirt...whatevs...Mama can't sew in the car on the way to church, eventually it's time to get dressed, and you've got to wear something. None of the other kids in the nursery were pointing and laughing, although Papa did enough of that for everybody. I used green and white seersucker with navy buttons and used navy embroidery thread to do a chunky running stitch around the top. I like the colors with his little navy sandals. Fortunately this will fit him better in a few months and then they'll be just right...he's only two so he should be able to wear them for about 13 more years, right?


Grammy sent a bubble gun for Easter, that's been a huge hit for both of us. I don't have the lung capacity to blow bubbles for hours and P loves bubbles.

Check out these rompers I finished last week for a customer. She ordered matching ones for her two boys. I love them and want to make some for July 4th! I'd love for P and my husband to match. Do you think I could get a pattern in a men's size medium?

Who's laughing now, Papa?!


Thursday, April 5, 2012

Celebrate Easter

We're finished with Easter week around here, just thought I'd give a quick recap and post links to all the different projects and ideas in one place. Also, I didn't get to share this picture. It's my boy with the bunny on his head, of course looking at his favorite page with the moped. He says "Ride? Ride? Go Ride?" until I find the page for him.


 Celebrate Easter at a Glance!

    Day #1 
Decorate Eggs with Toddlers 

Day #2  Sock Bunny 
Day #3
Bunny Bum Applique
                                                     
Day # 4 


Day #5
                                             
Day #6


Happy Easter! He is Risen! He is risen, indeed!

Wednesday, April 4, 2012

Celebrate Easter: Funny Bunny Cake


Growing up, one of our Easter traditions was making this bunny cake. We have a running joke in my family about traditions because about 10 years ago we were sitting around the table on Christmas morning and my Dad said that we 'didn't have any traditions.' Of course, everyone was incensed, especially my Mom (the facilitator of all the traditions) so we immediately starting compiling a list. My Dad soon had to admit that we do indeed have them, and even now we say things like "See that's a tradition!" Anyway, this bunny cake is one of the traditions I remember. I loved it! I'm not sure my brother cared quite as much as myself about creating detailed candy features for a bunny rabbit cake. Even though P is a little small to actually help with this, he is definitely old enough to appreciate it. I wish I'd had a video of him when he first saw it. "OOOOOH!" he said and then leaned down to give Mr. Bunny a big kiss.


This cake is ridiculously easy, I kept it really simple and cartoonish and only bought a few different candies, but you could go crazy and make this as elaborate and gorgeous as you want!

Here's what you need: 
2 round cakes
       use whatever recipe or box that you like, mine are 8" rounds, but you could go bigger or smaller
1 bag of sweetened, shredded coconut
basic white icing
       I made my own cream cheese frosting, you could use store bought. Warm it up a bit before trying to
       spread it on.
food coloring
large cardboard or cutting board covered with parchment or freezer paper
Optional: assorted candies, almonds, white/milk chocolate

Bake your cakes according to recipe/box instructions. I used a boxed carrot cake but added freshly grated carrots. It's actually really good! Let the cakes cool completely on a rack then take them out of the pans. One round will be Funny Bunny's face, you can go ahead and lay it on your prepared paper covered board. The other will become bunny's ears and bow tie.


Position ears and bow tie. My board is a little small, larger will help you keep the coconut from getting all over your house!


Now just go nuts with the icing! I started with a thin, careful "crumb coat" (it's tough not to spread crumbs once you start icing the cut portions), then followed up with a thicker layer. I used the flat of my knife to add a little texture as I went. I also set the bow tie aside for a moment because I wanted to ice it with colored icing. It doesn't have to be perfect because we are going to top this with coconut

Before starting the coconut, coat the paper background with a tiny bit of leftover white icing just a little so that the coconut 'grass' has something to stick to. Now pour about one cup of coconut in a small bowl and add 3-4 drops of green food coloring, stir until it's pretty evenly distributed then start patting it onto the paper background. Save the remaining green coconut for touch ups later. Once that's done, sprinkle the bunny with white coconut, patting it onto the vertical sides of the cake.


For the bow tie (I changed colors later because the blue was such a weird color, it actually looks better in this picture than in real life), dye a small amount of icing your desired color and ice the bow tie while still on a plate or the counter, then scoop it up with two spatulas and set in place on the board. You can leave it plain or add candy patterns.

Tangent: Dying icing in really bright colors never fails to remind me of that scene in "Hook" with Robin Williams where he finally sees the food then they start having a food fight. Great movie!

So! That's it! I kept a few dabs of white icing to stick jelly beans on the background and help some of the candy face stay put. Black licorice (cut in thin strips, I tried to find black "Pull and Peel" Twizzlers) for the eyebrows and mouth, a blob of pink icing with a jelly bean for the nose, M &M polka dots on the tie and almonds for the eyes. That was a new idea for me this year. I dipped them in a tiny bit of melted white chocolate, let that set then dipped again in a tiny bit of dark chocolate. I love the way they turned out. I'll be doing that again! After the candy was on, I added pink cheeks and a little pink to the ears. Just dye a small amount of coconut with one drop of red food coloring and sprinkle it on.


Stay on the lookout for chubby hands swiping your candy.


So fun and definitely something to do next year, hopefully we will have our own list of traditions going soon! I love how the jellybeans on the coconut grass look like little clusters of Easter eggs or spring tulips. Can't wait to eat it!

P.S. I'd love to see pictures of this if you make your own. Add them to the "You Sewed" Flickr pool, tab at the top right of the page.

Tuesday, April 3, 2012

Aden and Anais Swaddlers Tutorial


I'm departing for one day from Easter week and sharing a project. It's that time of year when everybody starts having babies and baby showers, so I feel like there's always a long list of gifts to pick up or make. I really enjoy doing baby gifts, I like to give things that are going to be pretty but practical so that they'll be used and loved on.

One of my top five favorite baby items when I first had P were those gorgeous Aden and Anais muslin swaddle blankets. They are huge and soft and sheer. They're perfect as sunshades for babies in the summer because they stay cool and they're a good size for nursing covers. Lots of boutique stores (and Buy Buy Baby) carry most of the prints, there are stripes, animals, polka dots, cupcakes... I really recommend them for a baby gift if you need one! Target carries a limited selection of prints for a significantly discounted price. Speaking of the price, they are a little steep. I figured, "How hard can it be to find this soft, natural muslin?" Well, the answer is pretty hard. I have not been able to find the exact quality, texture and softness of those blankets!

The closest thing that I've found is cotton gauze. You'll see it out now that the weather is warming up, I picked some up at Joann's for $6.99/yd in the apparel fabrics. There were quite a few bright solids and white, of course. The white was by far the softest so I chose that for my baby blankets. I'm thinking that the more it's washed and worn the softer it will get.


Each blanket takes 1 1/4 yard. I wanted two so I bought 2 1/2 yards; washed, dried and ironed it; trimmed off the selvages, split the piece in half and squared everything up. I found that snipping and ripping was the best way to get a straight line since this fabric is kind of wavy and stretchy.  Then just go to the ironing board (get yourself a nice book on tape or something) and start pressing the raw edges under 1/4 inch then under another 1/4 for the hem. (I did not miter the corners.) Next just sew around the edges with matching or contrast thread!


Now for the fun part! I wanted patterns similar to the Aden and Anais blankets so I busted out the trusty Tulip Soft Fabric Paint in matte, some foam stamps I picked up at Hobby Lobby a couple years ago ($1.99-99 cents for a sheet), and some cheap foam brushes. My dear friend, H, is having a boy so I decided to do animals on one and transportation on the other--you know, boy stuff!


I covered my coffee table with freezer paper, squeezed some paint on a paper plate and got stamping.


TIPS:

One thin, even coat looks the best! Dab paint onto the stamp with the foam brush.

Don't rock the stamp, press firmly all the way around so you get a clear impression on the edges too.

Don't forget to mix colors if you can't find the perfect shade (or don't want to buy a million tubes of paint). I have mostly primary colors that I mix until I get what I want, but mix enough at once for the whole blanket so you don't change shades part way through.

If the stamp isn't exactly what you want, change it! I went back with a foam brush and blotted out the faces on my goofy monkey and lion so I had less cartoonish animal shapes.

Decide the 'pattern' before you start stamping, but don't stress about it! I didn't measure or anything like that, just eye it and do what looks right! For the cars and train blanket I stamped all the trains then went back and filled in with cars. The animals I did one row at a time from top to bottom and just kept changing stamps/colors with each row. I think the train/car blanket went faster.

Let the paint dry a few hours before handling, heat set with a hot iron and wait about 72 hours before washing. 


P recognized these blankets as soon as he saw them and grabbed them off my work table to snuggle! He sleeps with an Aden and Anais blanket almost every night.


Since these are hand stamped, every impression is a little different. I think that just makes them more special. They're handmade without looking home-made. Think of all the things you could do! I love the idea of getting some letter stamps and creating a print with initials or just a single initial. They can also be packaged in so many cute ways, roll them up and tie with ribbon, maybe tie a small toy on top or stuff them in a basket with other baby goodies. You could even gift a baby book along with blankets decorated with colors and images from the book. Wouldn't a set of Goodnight Moon or Hungry Catterpillar blankets be awesome! Can't wait to make more!


Monday, April 2, 2012

Celebrate Easter: Teach Kids the Real Meaning of Easter


My little guy is only 22 months old, but I am always amazed at how much he notices and understands and remembers. It is not too early to teach him Scripture and Bible stories. Though he's too young yet to grasp the concept of God incarnate coming to earth in the person of Jesus, who sacrificed Himself to atone for the sin of mankind then rose again to bring "life on life for you and me" on Easter morning, I don't think it can possibly be too early to start talking about it. I don't want him to know a day before he heard the gospel and loved the Lord, so we will talk and pray and read, hoping that the Holy Spirit will make his heart soft and that he will understand and know for himself the peace that surpasses all understanding and the joy that can only come from knowing the truth.
 
 
As P gets bigger, I have been interested in finding creative ways to teach him about God, particularly around the holidays when the focus is so often diverted too much to the trivial or the self-indulgent. To me, there's nothing wrong with fun traditions and things like the Easter bunny and Santa, but I hope that in our family those things never outshine the hope that we have in Christ!
 
 
So, here's a roundup of a few neat ways to teach your little ones the meaning of Easter or maybe just be a sweet reminder to you as you're decorating and cooking and dying eggs that there is nothing more important for a Christian than the fact that Christ died but rose again.


1) Almond Cookies: Each step of this recipe tells part of the Easter story. Older children can help make these cookies and you have a neat opportunity to talk through the gospel while your hands are busy with the steps that represent each part.

2) Resurrection Eggs: I used to get these in Sunday school years ago, the 12 eggs are filled with small items that represent everything that happened during Holy Week and an accompanying scripture reference. A thorn, a sponge, a small cross, a stone, and the last egg is empty. The 'The strife is o'er, the battle done! The vicory of life is won!" This talented blogger also had the idea of using these eggs on your Easter table, each person opening an egg and sharing what's inside. She has free printables for the cute presentation.

3) Resurrection Rolls: Here's another recipe, but it's definitely semi-homemade. All you need are marshmallows, cinnamon, sugar and crescent rolls. You wrap dough around a marshmallow and when they bake, the marshmallow melts and you are left with the miracle of an "empty tomb," children will be excited and it's a good conversation starter.


4) Easter Garden: I couldn't find the original source of this (it's all over Pinterest), but I like the idea of growing wheat grass this time of year and incorporating it into a centerpiece or mini garden for your kitchen window. It looks a little 'bonsai' to me :).
5) 12 Day Countdown to Easter with stories and activities: This blogger created a 12 day countdown to Easter with suggestions of gospel stories for each day along with some activities. It's a good resource!


6) Easter Garden and Linky Party: Here's another Easter Garden but this blogger's daughter helped make it, I love the empty potato tomb! For this post she was also hosting a 'linky party' of ideas for sharing the real meaning of Easter with your children-there are close to a hundred ideas all in one place! I didn't screen them all so you may have to pick through.


Let me just leave you with a bit of text from my favorite Easter hymn:

"Look there! The Christ, our Brother, comes resplendant from the gallows tree,
And what He brings in His hurt hands is life on life for you and me!

Joy, Joy! Joy to the heart all in this good day's dawning!

Good Jesus Christ, inside His pain, looked down Golgotha's stony slope,
And let the blood flow from His flesh to fill the springs of living hope!"

 Joy, Joy! Joy to the heart all in this good day's dawning!"