Showing posts with label Gifts. Show all posts

Tuesday, February 26, 2013

Pinterest Challenge: Aden and Anais Swaddlers

I'm working on a few baby gifts this week. It corresponded perfectly with the Pinterest challenge going on over at Young House Love. I've had some "Pinspirations" in mind.

The Wiegands

I've been drooling over this bold, black and white baby blanket above. It looks like a knit, but I chose woven cotton gauze for my project. Like Aden and Anais swaddling blankets (TUTORIAL HERE).

I also have been loving all the triangle/tribal type prints that are popping up.

See Kate Sew

The Wiegands

Here are my Pinterest inspired, hand stamped, swaddling blankets.


They're cotton gauze, a little stretchy and beautifully breathable...happy baby!  For gifts you can roll them up and tie with cute ribbon and a little tag. I love that the colors and patterns are a bit nontraditional for babies, I get tired of dinosaurs and animals.


For my blankets, I decided to go with potato stamping so that I could have complete freedom on size and shape...not to mention it's cheap.


I cut the potatoes in half then scratch the shape into them with a blunt pencil (if it's something more complicated) then carefully cut around it with a knife. You have to dry it off with paper towels every so often because water leeches out of the potato and can give you some bleeding if you're not careful. They will last a few days if you wrap them up with plastic, and they work best if you stick with a single color per stamp. You could start out stamping with your lightest color, wipe off as much paint as you can, then go darker at the end--dark to light makes a bit of a mess. 

For the color gradient on the black trees blanket, I applied paint to the stamp with a foam brush then stamped three times before reapplying paint. I always use tulip, soft, matte fabric paint and stamped it in a completely random pattern, I like it! 


The other blanket is all triangles of different sizes and colors.


I'm in love with this one.


Hope these gifts will be enjoyed! Visit THIS POST for a complete, step by step tutorial on making knock off Aden and Anais Swaddlers. 


BLOOPER: 

Funny story ...I picked up a 99 cent foam stamp from hobby lobby...here it is:


Hmm, devil face? Perfect for a baby blanket right? 

Heel no! It totally looked like an owl before stamping. I blotted out the scary mouth feathers and it took some of the frightening out of this little blanket. 

I just want to know who is in charge of checking to make sure stamps don't inadvertently look like devil faces. I think Hobby Lobby in particular would be horrified by this.

(owls to the left, devils to the right... hands in the air! sorry, that sounded so much like a line dance that I couldn't resist...)


Thursday, December 27, 2012

Christmas

Merry Christmas! It flew by too fast as usual and is a bit of a blur. I don't know how much of that is going through the holidays for the first time with two babies and how much was my poor sick two year old who was up every few hours with a cough and fever every night leading up to Christmas.

This Christmas a cough, last Christmas pinkeye...

2012

2011

Poor little man was pretty miserable both years, but after a few doses of good medicine he was up and about and playing with Christmas toys again! I'm really grateful for antibiotics--it's a terrible, helpless feeling when your baby is sick. Next year I'm going to put him in isolation right after Thanksgiving. 

P was a really fun age this year! He loved the Christmas tree and Christmas cookies and Christmas music, we talked a lot about Jesus' birthday. I got some electric candles for an advent wreath, which he didn't fully understand, but he called them Jesus' birthday candles and carried them around the house. Santa was super exciting too, he wasn't terrified. 


He got really into the old clay-mation Rudolph, from the 70's/80's. This is his "very, shiny nose."


Me, mom, sis and sis-in-law did our annual Christmas lunch at a great little place out in the country. Baby V is swaddled up and lying on the floor behind us for the photo :).


We even had some snow this year (before Christmas). P said it was "yucky."


Baby V was baptized on Christmas Adam (Dec. 23). It was a really sweet celebration and covenant with our church family. The church was decorated beautifully!


V is starting to look so big and be really interested in what's going on around him. He grabs at toys and smiles and laughs constantly.


Christmas Eve!


V was a party animal on Christmas Eve, but...


...he slept through Christmas morning.


P had a ball (even with his cough)! This is the train board we made for him. I painted water and roads and trees and such, then we glued down the pieces. It's really fun and he seems to like it. I'll post some more info on how we did it in a later post.


It was a wonderful Christmas spent with family. We are blessed beyond belief and rejoice wholeheartedly in God's great mercy, Christ came to dwell with us and to restore us to the glorious presence of God! Though there is pain and sadness and broken relationships here on earth, He will wipe all that away when He comes again. Come soon, Lord Jesus!

Friday, July 20, 2012

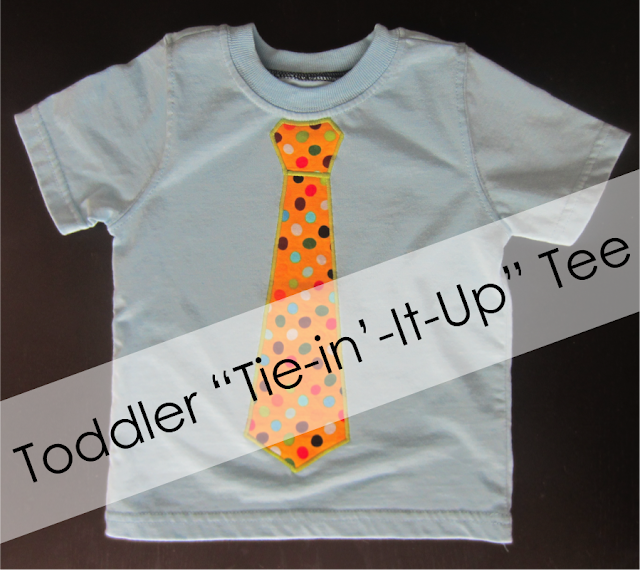
"Tie-in'-It-Up" Tee

Back in April a good college friend, whom I don't get to see nearly often enough :), emailed and asked me to make a t-shirt with an appliqué tie on the front for her little man's first birthday party. I have seen these everywhere...bibs with ties, tee's and onesies with ties, you name it...but I've never made one myself. So I was excited to do it. I found an inexpensive 18-24 month tee at Old Navy, it had a chest pocket but I removed that before pre-washing and drying. You can't even see where it was.

This is a quick and easy project!

Here's what you need: 
Tee, onesie, bib, etc...
small piece of cotton fabric (woven or knit is fine, just make sure it's washable)
lightweight and medium weight fusible interfacing
chalk or disappearing ink pen
pins, thread, sewing machine, scissors


1) First decide on the size and shape of your tie. This is personal preference. Fatter and shorter makes it look more "cartoonish," my friend specifically requested a more narrow, realistic tie. Practice on tissue paper until you get what you want, keep it proportional to the garment you are working with. Also, be sure that when you cut it out, that the left and right sides are symmetrical.

2) Back the tie with lightweight fusible interfacing and press a strip of medium weight inside the shirt. Position the tie and pin securely. Set your machine to a dense, wide zig-zag stitch (I used 0.8 density and between 2.8 and 3.0 width) and turn the thread tension down a bit (I used 3). See my "Tips and Tricks to Applique." Careful not to stretch the tee as you sew, sew the tie to the shirt.


3) Peel away and trim off as much of the medium weight interfacing as possible from the inside of the shirt (I find it makes the shirt feel a bit stiff if left on). Press with a little steam if you have any funny wrinkles. That's it! Enjoy!


Even better when it's adorning an adorable chunk of baby boy! Happy birthday little guy!


Wednesday, May 30, 2012

Family Photos

I just finished up an Etsy order for a family (some of my extended family actually) who is having pictures made. Three boys and a girl. A GIRL! I got to do ruffles...


Lots of ruffles...


And use some fabrics with flowers and pinks thrown in there. It was so fun!


 I used Simplicity 2171, I think it's a little Matilda Jane'ish. Love it! I liked the pattern, I'll do a review soon and let you know what I changed.


My aunt also ordered a baby photo book (See others HERE and HERE). She requested that I add 'taggie' details, a great idea, I thought.


Fun textures, bright colors, faces they know and love...it's a baby's paradise!


Have a great day!!

Tuesday, April 3, 2012

Aden and Anais Swaddlers Tutorial


I'm departing for one day from Easter week and sharing a project. It's that time of year when everybody starts having babies and baby showers, so I feel like there's always a long list of gifts to pick up or make. I really enjoy doing baby gifts, I like to give things that are going to be pretty but practical so that they'll be used and loved on.

One of my top five favorite baby items when I first had P were those gorgeous Aden and Anais muslin swaddle blankets. They are huge and soft and sheer. They're perfect as sunshades for babies in the summer because they stay cool and they're a good size for nursing covers. Lots of boutique stores (and Buy Buy Baby) carry most of the prints, there are stripes, animals, polka dots, cupcakes... I really recommend them for a baby gift if you need one! Target carries a limited selection of prints for a significantly discounted price. Speaking of the price, they are a little steep. I figured, "How hard can it be to find this soft, natural muslin?" Well, the answer is pretty hard. I have not been able to find the exact quality, texture and softness of those blankets!

The closest thing that I've found is cotton gauze. You'll see it out now that the weather is warming up, I picked some up at Joann's for $6.99/yd in the apparel fabrics. There were quite a few bright solids and white, of course. The white was by far the softest so I chose that for my baby blankets. I'm thinking that the more it's washed and worn the softer it will get.


Each blanket takes 1 1/4 yard. I wanted two so I bought 2 1/2 yards; washed, dried and ironed it; trimmed off the selvages, split the piece in half and squared everything up. I found that snipping and ripping was the best way to get a straight line since this fabric is kind of wavy and stretchy.  Then just go to the ironing board (get yourself a nice book on tape or something) and start pressing the raw edges under 1/4 inch then under another 1/4 for the hem. (I did not miter the corners.) Next just sew around the edges with matching or contrast thread!


Now for the fun part! I wanted patterns similar to the Aden and Anais blankets so I busted out the trusty Tulip Soft Fabric Paint in matte, some foam stamps I picked up at Hobby Lobby a couple years ago ($1.99-99 cents for a sheet), and some cheap foam brushes. My dear friend, H, is having a boy so I decided to do animals on one and transportation on the other--you know, boy stuff!


I covered my coffee table with freezer paper, squeezed some paint on a paper plate and got stamping.


TIPS:

One thin, even coat looks the best! Dab paint onto the stamp with the foam brush.

Don't rock the stamp, press firmly all the way around so you get a clear impression on the edges too.

Don't forget to mix colors if you can't find the perfect shade (or don't want to buy a million tubes of paint). I have mostly primary colors that I mix until I get what I want, but mix enough at once for the whole blanket so you don't change shades part way through.

If the stamp isn't exactly what you want, change it! I went back with a foam brush and blotted out the faces on my goofy monkey and lion so I had less cartoonish animal shapes.

Decide the 'pattern' before you start stamping, but don't stress about it! I didn't measure or anything like that, just eye it and do what looks right! For the cars and train blanket I stamped all the trains then went back and filled in with cars. The animals I did one row at a time from top to bottom and just kept changing stamps/colors with each row. I think the train/car blanket went faster.

Let the paint dry a few hours before handling, heat set with a hot iron and wait about 72 hours before washing. 


P recognized these blankets as soon as he saw them and grabbed them off my work table to snuggle! He sleeps with an Aden and Anais blanket almost every night.


Since these are hand stamped, every impression is a little different. I think that just makes them more special. They're handmade without looking home-made. Think of all the things you could do! I love the idea of getting some letter stamps and creating a print with initials or just a single initial. They can also be packaged in so many cute ways, roll them up and tie with ribbon, maybe tie a small toy on top or stuff them in a basket with other baby goodies. You could even gift a baby book along with blankets decorated with colors and images from the book. Wouldn't a set of Goodnight Moon or Hungry Catterpillar blankets be awesome! Can't wait to make more!


Monday, February 27, 2012

Hand Embroidered Baby Pants

My sweet friend C had her baby a couple of weeks ago, so I got busy working on a little gift for him. This Handcut Chenille Baby Blanket and little bitty pair of soft, gray, wide wale corduroy pants.

They have a comfy elastic waist and they're long in the rise so there is plenty of wiggle and diaper room. I used Made by Rae's Basic Baby Pants Pattern (free HERE), but I added a little to the length because she only calls for a 1/4" hem and I like a wider hem. I also topstitched the side seams and rise because I like the look and makes them a bit more sturdy.


I decided to personalize them, hand embroidering little man's name along the hem.


I added a little twill tag in the back. I've learned from experience that new dads do not appreciate having to guess which is the front and which is the back when dressing a squalling little one.


I used a disappearing marker to draw the letters, emroidered the main outline in white then added a little extra so that I would have some areas to fill in with color. These were just free hand for me, but you could play around with fonts on your computer or sketch them out until you have what you want. I was envisioning bright, vintagey circus posters when I did this. Boys clothes need some color too!


Can't wait to meet this little guy in person!