

Showing posts with label Cook. Show all posts
Showing posts with label Cook. Show all posts
Thursday, August 2, 2012
Come Visit...
I shared a few weeks ago that I would be guest posting for Boy, Oh Boy, Oh Boy and Melly Sews for their "Sew in Tune" series. It's been really fun to see what all these creative Mamas have come up with so far and great to get some new ideas for boy projects. If you haven't already been following, take a look! My post is going up over at Boy, Oh Boy, Oh Boy this morning! Check it out, P and I had a lot of fun with this...there may even be a super simple, summer recipe involved.
Tuesday, May 22, 2012
The best thing I ever ate...excepting Praline Bacon
Last week, I was grocery shopping and realized that all the organic baby spinach was sold out. I started scouting around for a replacement, and spotted some greens called "Organic Girl." Still no spinach, but they had a baby spinach/arugula mix that looked good. That's a pic of arugula on the right, kinda looks like oak leaves.

These greens are soo, soo good. I hope I can find them when I move back to KY. They have stayed fresh and bright (no slime) for more than a week, no gritty stuff to be found, and I am now a humongous fan of arugula. I've eaten it like twice a day since last Monday on sandwiches, in salads, all sorts of green goodness. (good for little baby too).
You might not know this about me but I love sandwiches. I could eat one for lunch and dinner every day of the week and not have even an inkling of 'ennui.' Hot, cold, grilled, sweet and savory...you name it. Arugula on a sandwich was a bit of a revelation. One day last week I made this...

That bright, crisp, herby, almost anise flavor of the arugula was absolutely to die for paired with hearty wheat, oven roasted turkey, fresh, perfect tomato slices, salt, pepper and plenty of mayonnaise. I really can't say enough. I've been recreating this sandwich, every day around 12:00 pm for the past seven days.
Yes, there is a large bite out of that sandwich.
Well...how else was I to know it was one of the "best things I ever ate?"
Anyway, get ya some arugula and don't forget the tomatoes.
 |
| SOURCE |
You might not know this about me but I love sandwiches. I could eat one for lunch and dinner every day of the week and not have even an inkling of 'ennui.' Hot, cold, grilled, sweet and savory...you name it. Arugula on a sandwich was a bit of a revelation. One day last week I made this...

That bright, crisp, herby, almost anise flavor of the arugula was absolutely to die for paired with hearty wheat, oven roasted turkey, fresh, perfect tomato slices, salt, pepper and plenty of mayonnaise. I really can't say enough. I've been recreating this sandwich, every day around 12:00 pm for the past seven days.
Yes, there is a large bite out of that sandwich.
Well...how else was I to know it was one of the "best things I ever ate?"
Anyway, get ya some arugula and don't forget the tomatoes.
Wednesday, April 4, 2012
Celebrate Easter: Funny Bunny Cake

Growing up, one of our Easter traditions was making this bunny cake. We have a running joke in my family about traditions because about 10 years ago we were sitting around the table on Christmas morning and my Dad said that we 'didn't have any traditions.' Of course, everyone was incensed, especially my Mom (the facilitator of all the traditions) so we immediately starting compiling a list. My Dad soon had to admit that we do indeed have them, and even now we say things like "See that's a tradition!" Anyway, this bunny cake is one of the traditions I remember. I loved it! I'm not sure my brother cared quite as much as myself about creating detailed candy features for a bunny rabbit cake. Even though P is a little small to actually help with this, he is definitely old enough to appreciate it. I wish I'd had a video of him when he first saw it. "OOOOOH!" he said and then leaned down to give Mr. Bunny a big kiss.

This cake is ridiculously easy, I kept it really simple and cartoonish and only bought a few different candies, but you could go crazy and make this as elaborate and gorgeous as you want!
Here's what you need:
2 round cakes
use whatever recipe or box that you like, mine are 8" rounds, but you could go bigger or smaller
1 bag of sweetened, shredded coconut
basic white icing
I made my own cream cheese frosting, you could use store bought. Warm it up a bit before trying to
spread it on.
food coloring
large cardboard or cutting board covered with parchment or freezer paper
Optional: assorted candies, almonds, white/milk chocolate
Bake your cakes according to recipe/box instructions. I used a boxed carrot cake but added freshly grated carrots. It's actually really good! Let the cakes cool completely on a rack then take them out of the pans. One round will be Funny Bunny's face, you can go ahead and lay it on your prepared paper covered board. The other will become bunny's ears and bow tie.

Position ears and bow tie. My board is a little small, larger will help you keep the coconut from getting all over your house!


Now just go nuts with the icing! I started with a thin, careful "crumb coat" (it's tough not to spread crumbs once you start icing the cut portions), then followed up with a thicker layer. I used the flat of my knife to add a little texture as I went. I also set the bow tie aside for a moment because I wanted to ice it with colored icing. It doesn't have to be perfect because we are going to top this with coconut
Before starting the coconut, coat the paper background with a tiny bit of leftover white icing just a little so that the coconut 'grass' has something to stick to. Now pour about one cup of coconut in a small bowl and add 3-4 drops of green food coloring, stir until it's pretty evenly distributed then start patting it onto the paper background. Save the remaining green coconut for touch ups later. Once that's done, sprinkle the bunny with white coconut, patting it onto the vertical sides of the cake.

For the bow tie (I changed colors later because the blue was such a weird color, it actually looks better in this picture than in real life), dye a small amount of icing your desired color and ice the bow tie while still on a plate or the counter, then scoop it up with two spatulas and set in place on the board. You can leave it plain or add candy patterns.
Tangent: Dying icing in really bright colors never fails to remind me of that scene in "Hook" with Robin Williams where he finally sees the food then they start having a food fight. Great movie!
So! That's it! I kept a few dabs of white icing to stick jelly beans on the background and help some of the candy face stay put. Black licorice (cut in thin strips, I tried to find black "Pull and Peel" Twizzlers) for the eyebrows and mouth, a blob of pink icing with a jelly bean for the nose, M &M polka dots on the tie and almonds for the eyes. That was a new idea for me this year. I dipped them in a tiny bit of melted white chocolate, let that set then dipped again in a tiny bit of dark chocolate. I love the way they turned out. I'll be doing that again! After the candy was on, I added pink cheeks and a little pink to the ears. Just dye a small amount of coconut with one drop of red food coloring and sprinkle it on.

Stay on the lookout for chubby hands swiping your candy.

So fun and definitely something to do next year, hopefully we will have our own list of traditions going soon! I love how the jellybeans on the coconut grass look like little clusters of Easter eggs or spring tulips. Can't wait to eat it!
P.S. I'd love to see pictures of this if you make your own. Add them to the "You Sewed" Flickr pool, tab at the top right of the page.
Wednesday, March 21, 2012
You know it's almost summer when...
Here in New Orleans it has felt like spring for a few months now, so when W and P and I ran over to the Crescent City Farmer's Market on Saturday morning, it was no surprise to find produce that we would only see at the height of summer in KY. It's really summer when you can get fresh tomatoes straight from the garden. Tomatoes that have that strong, almost grassy smell and have never been refrigerated. Tomatoes should NEVER be refrigerated, it's sacrilege! They instantly change texture from firm and perfect to grainy and mushy.
Anyway, the farmer's market was small but really cute and had lots of booths. There were veggies, homemade dips and spreads, seafood being sold out of coolers, and even an organic chicken farmer. Strawberries are in season here, so people were walking off in all directions with flats of the best looking berries I've ever seen. I was thrilled to see bunches of fresh cilantro and tomatoes at another booth so I stocked up on both because I made Pioneer Woman's pico de gallo over the weekend. W (the husband) said it was the best salsa he'd ever eaten! This is high praise from someone who "Eats to Live," he doesn't "Live to Eat" like I do!
Sorry no pictures...we ate it too fast. I did snap a photo of the tomatoes though!

PW's Pico de Gallo
3 big tomatoes (she uses 5 roma tomatoes, but I like regular)
2 jalapenos seeded and diced
1/2 sweet onion, diced
1 bunch of cilantro, roughly chopped
Juice of 2 limes (she uses a little less, but I really like tangy salsa)
salt to taste
It was so good with those fresh ingredients and super fast and easy! I followed her directions to roughly chop everything, but cilantro tends to clump together when it's in big pieces and the texture wasn't as palatable. At the end, I used my immersion blender and just pulsed it a few times so that the salsa had a more uniform texture--almost like restaurant style. It was exactly the way we like it!
Ahh, summer!
Monday, February 20, 2012
Donuts
Last week, I ran across a neat recipe on Pinterest, easy homemade donuts using canned, Pilsbury biscuit dough. I guess they're more of a semi-homemade item (See the original post HERE) I like to do fun things for breakfast on weekends, so we gave them a try!

They were gooooood! Just be sure to eat them while they're hot. They definitely lose the magic after they cool off and the texture gets heavy, they're light and tender right out of the pan.

Here's the bad news:
You fry them up in about 1 inch of oil then you dip them in melted butter, then sprinkle liberally with cinnamon and sugar. Keep these in the "Only in Moderation" section of your recipe box.
Also, they make your house smell like a roller skating rink, something about that hot oil/frying smell takes me right back to elementary school birthday parties at Champs. Let's just say, not the best memories, I was not a cool kid.
All you need for these are:
1 can of Pilsbury "Grands" biscuits (you don't want flaky)
Cooking oil
1 stick of butter
Cinnamon/Sugar
Tips:
Use the donut holes for practice while you're getting the oil to the right temperature. Too hot and the middles will be raw, too cool and they will be greasy. I burned one or two...


Cool enough to cook about 3 minutes on each side and hot enough to bubble. Pop them out and onto a paper towel lined plate then dip in the butter and sugar.
Yummy, yum!


They were gooooood! Just be sure to eat them while they're hot. They definitely lose the magic after they cool off and the texture gets heavy, they're light and tender right out of the pan.

Here's the bad news:
You fry them up in about 1 inch of oil then you dip them in melted butter, then sprinkle liberally with cinnamon and sugar. Keep these in the "Only in Moderation" section of your recipe box.
Also, they make your house smell like a roller skating rink, something about that hot oil/frying smell takes me right back to elementary school birthday parties at Champs. Let's just say, not the best memories, I was not a cool kid.
All you need for these are:
1 can of Pilsbury "Grands" biscuits (you don't want flaky)
Cooking oil
1 stick of butter
Cinnamon/Sugar
Tips:
Use the donut holes for practice while you're getting the oil to the right temperature. Too hot and the middles will be raw, too cool and they will be greasy. I burned one or two...

I got it eventually...

Yummy, yum!

Wednesday, February 15, 2012
Valentine's Day
We had a nice day yesterday, beautiful 70 degree weather and W got home early from work. I made these "Break My Heart" Valentines for the boys. P's was filled with M&M's, he loved it! I made W's with these really delicious chocolate cherry swirl Dove chocolates. There is a tutorial HERE. The only thing I did differently was to reduce my stitch width for the perforation step so that it would tear a little easier.

We (generally) don't do big gifts at Valetine's Day, maybe a card or some candy and flowers. For W, I decided to make a really fantastic meal. I have to say, it might be one of the best meals I have ever made. We had lamb shank braised with rosemary, onions, carrots and white wine (recipe, Creating a Stir) because W LOVES lamb and we rarely buy nice cuts of meat like that. I also made Pioneer Woman's burgundy mushrooms (I 4th'd the recipe and it was still way more than we needed for two people). These were absolutely TO. DIE. FOR. Truly, the flavor is out of this world, and the broth...I have no words. You'll want to lap it right out of the pan. I combined it with some of the braising liquid to make a delicious sauce that I drizzled over the lamb, mushrooms and creamy mashed potatoes.

W was so sweet, he gave me a beautiful fleur-de-lis necklace. I love it! It's such a symbol of New Orleans, something fun to remember this year by.

We (generally) don't do big gifts at Valetine's Day, maybe a card or some candy and flowers. For W, I decided to make a really fantastic meal. I have to say, it might be one of the best meals I have ever made. We had lamb shank braised with rosemary, onions, carrots and white wine (recipe, Creating a Stir) because W LOVES lamb and we rarely buy nice cuts of meat like that. I also made Pioneer Woman's burgundy mushrooms (I 4th'd the recipe and it was still way more than we needed for two people). These were absolutely TO. DIE. FOR. Truly, the flavor is out of this world, and the broth...I have no words. You'll want to lap it right out of the pan. I combined it with some of the braising liquid to make a delicious sauce that I drizzled over the lamb, mushrooms and creamy mashed potatoes.
It was so good, but we were too full to eat after just a few bites and will be feasting on leftovers this week. This isn't a great picture, it was really dark!

W was so sweet, he gave me a beautiful fleur-de-lis necklace. I love it! It's such a symbol of New Orleans, something fun to remember this year by.
Sunday, February 12, 2012
Sweets for the Sweet: Chocolate-Raspberry-Coconut Squares

Today, I'm sharing one of my all-time favorite recipes from one of my all-time favorite cookbooks (Creating a Stir, put out by the Lexington Medical Society Auxiliary). Every recipe I've tried from this book has been fantastic and a definite "I'll make this again." Great cookbook!
Today's "Sweets for the Sweet" are Chocolate-Raspberry-Coconut Squares. They are bar cookies, made in several layers with a few of, in my opinion, the best flavors in the world! There is something irresistable about chocolate and raspberry paired together, top that with coconut and you've got yourself a deal! Not to mention, they are very easy and sure to turn out perfectly. They also seem 'special,' so I wouldn't hesitate to package them up and give them as a gift, serve them when friends come over, or send with my "Sweet" for a little Valentine's Day lunch surprise.

How it's done and what you need:
Crust:
1 c. all-purpse flour
1/4 c. firmly packed brown sugar
1/2 c. butter, chilled and cut into pieces
Middle Layer:
1 c. sweetened condensed milk (yes, please!!)
1/2 c. all-purpose flour
1/2 tsp. baking powder
1/4 tsp. salt
2 large eggs
1 c. semisweet chocolate chips
1 c. flaked coconut
1/2 c. chopped pecans
Topping:
1/2 c. raspberry preserves
1/3 c. flaked coconut, toasted
Preheat oven to 350 F.
Combine flour and brown sugar, cut in chilled butter with a fork or pastry cutter until uniformly crumbly. Press into greased 9" square pan. Bake for 15 minutes.
While the crust is baking, mix up the middle layer. In a large bowl, combine condensed milk, flour, baking powder, salt, and eggs. Mix well then stir in chocolate chips, coconut and pecans.
Spread middle layer mixture over the prepared crust. Spread gently to avoid breaking up the crust. (The condensed milk really makes this delicious!)

After spreading evenly, bake 20-25 minutes, until a knife in the center comes out clean. Mine was perfect at 20.
While this is baking, toast the coconut for topping. It's not hard, just watch it like a hawk. Spread coconut in a thin layer on a baking sheet and stick under the broiler with the oven door open. Pull it out the instant you start to see color, stir and put back in if needed. Never walk away!
After baking, spread the raspberry preserves evenly over the hot cookie and sprinkle with toasted coconut. Let cool completely before slicing them up.

These are absolutely decadent and delicious! You won't be able to stop eating them. Enjoy and treat your sweetie!
Friday, February 10, 2012
Sweets for the Sweet:"Love Letters"

In honor of Valentine's Day, I thought for the next few days I would feature some sweet treats. Some old, some new, all delectable and all destined to make your holiday just a little...sweeter!
I posted about the "Brownies of My Dreams" (above) not too long ago, they are rich and decadent and perfect when eaten warm with maybe a fresh strawberry and a dollop of whipped cream. Yummy-yum!
Today, I tried a new recipe, from a very old book. My grandmother gives these books to each granddaughter who gets married. It's such a neat book, with recipes from the 1920's through the 60's. There are standards like sugar cookies and chocolate chip, and also the old-fashioned versions that are a little more time consuming or call for ingredients we don't use so often anymore. There are cookies filled with jam, citrus zest or folded into intricate patterns. It's a treasure, I enjoy just flipping through it and I always make something new from this book at Christmas.

I saw this recipe and thought I would give it a try. "Love Letters."

I halved the recipe above, used only orange zest, added a little vanilla and a drop or two of food coloring and used mini m&m's instead of candied cherry.

Cute little envelopes, folded and sealed with a sweet bite of chocolate...or a kiss. The orange zest makes this cookie bright, fragrant and fresh and the sour cream adds a little creaminess. They aren't super sweet, so they're the perfect bite with a cup of hot, black tea.
These are simple to make, mix dry ingredients as described above. Then cut in the cold butter with a fork and knife or a pastry cutter. It should look crumbly.

Add the sour cream and dab of food coloring if you want, mix well, roll into a ball and CHILL IN THE REFRIGERATOR FOR ABOUT 30 minutes. Believe me, this step will make your life easier!
After chilling, roll out the dough on a well floured surface. I used a pizza cutter to cut strips then a spatula to lop off the corners. Fold points in and seal with a small piece of candy.

Bake about 6 minutes at 400 F. Enjoy!

Tuesday, January 31, 2012
Brownies and the Bachelor
Oh, the Bachelor! What in the world is going on with this season? Has there ever been a woman as abrasive and sickening as Courtney? It makes me ill to think that there are women out there who really believe that using mind (and body) games and manipulation to "win" a man is acceptable! It shows so little respect for men and her extreme arrogance...it's painful.
My two favorites are Casey B. and Emily, they are genuine and smart and very 'what-you-see-is-what-you-get.' It must be maddening to have to live 24 hours a day in a small space with Courtney and her obnoxious facial expressions. Even though I see Emily digging her own grave every time she bashes Courtney to Ben, I can sympathize with her and it would be tough not to try to take the whole thing into your own hands. Frustrating! And Ben, get a haircut, man!
Luckily for me, yesterday afternoon, I was craving brownies and made a yummy batch so I had one (or five) to sweeten the whole Bachelor experience. These are "The Brownies of My Dreams." I ruled out a lot of recipes before I found them and believe you me, I have a pretty specific set of guidelines. I don't like crisp edges, chewiness, icing, filling or cake-like texture. I love dense, dark chocolately, not too sweet, European style brownies. Nuts and chocolate chips are fine in the right proportions. After trying many recipes and reading many more, I've determined the things you need to look for in a good brownie recipe (if you have the same brownie needs as myself, of course).
-Not too much flour. If the recipe calls for a ratio of more than 1 cup of flour to
5-7 oz. chocolate, then it's going to be cakey. Cakey = not good.
-Lots of chocolate. Calls for melted chocolate, not just cocoa powder.
-Calls for eggs but NOT baking powder or soda. Powder or soda makes them too fluffy and cake-like.
-Calls for butter, not oil.
Here they are!


I cut them small because I like my chocolate bite-sized and often.
The Brownies of My Dreams:
1 stick of butter
2 T. of strong, brewed coffee (Is there any other kind, really?)
6-7 oz. of bittersweet or semi-sweet baking chocolate or a combination
2 T. cocoa powder
1/2 c. granulated sugar
1/2 c. brown sugar
1 tsp. vanilla
3 large eggs
3/4 c. all-purpose flour
1/4 tsp. salt
Preheat oven to 350, grease a piece of parchment paper (or foil) to line an 8x8 baking pan.

Melt butter and chocolate in a small saucepan, add cocoa powder, sugar, brown sugar and vanilla. Continue stirring over low heat until sugar mostly dissolved. Remove from heat.
Lightly beat 3 eggs in a separate small bowl or cup, slowly add about a cup of the hot chocolate mixture into the eggs stirring constantly, then add eggs back into the saucepan, still stirring. (This is called tempering the eggs and it's a really important step, nobody likes scrambled egg curls in their brownies.) Add salt then whisk in flour a little at a time until smooth. If you want nuts or chocolate chips, stir them in now.
Pour a bit of batter onto the parchment (helps weigh it down while you fold corners like wrapping a package so that you'll end up with a nice square edge). Add the rest of the batter. The good thing about baking with parchment is you can just lift the whole pan of brownies out and onto a cutting board after they cool. It would be great for cakes and things too!

Bake 15-20 minutes, until a toothpick or fork comes out with crumbs stuck to it. If the stick comes out clean, then they are overdone.
Delightful, delectable, brownies of my dreams...I think I'll have one now.

"I wonder if he's ever gone skinny-dipping with a model before?"
"Winning!"
My two favorites are Casey B. and Emily, they are genuine and smart and very 'what-you-see-is-what-you-get.' It must be maddening to have to live 24 hours a day in a small space with Courtney and her obnoxious facial expressions. Even though I see Emily digging her own grave every time she bashes Courtney to Ben, I can sympathize with her and it would be tough not to try to take the whole thing into your own hands. Frustrating! And Ben, get a haircut, man!
 |
| Source |
Luckily for me, yesterday afternoon, I was craving brownies and made a yummy batch so I had one (or five) to sweeten the whole Bachelor experience. These are "The Brownies of My Dreams." I ruled out a lot of recipes before I found them and believe you me, I have a pretty specific set of guidelines. I don't like crisp edges, chewiness, icing, filling or cake-like texture. I love dense, dark chocolately, not too sweet, European style brownies. Nuts and chocolate chips are fine in the right proportions. After trying many recipes and reading many more, I've determined the things you need to look for in a good brownie recipe (if you have the same brownie needs as myself, of course).
-Not too much flour. If the recipe calls for a ratio of more than 1 cup of flour to
5-7 oz. chocolate, then it's going to be cakey. Cakey = not good.
-Lots of chocolate. Calls for melted chocolate, not just cocoa powder.
-Calls for eggs but NOT baking powder or soda. Powder or soda makes them too fluffy and cake-like.
-Calls for butter, not oil.
Here they are!


I cut them small because I like my chocolate bite-sized and often.
The Brownies of My Dreams:
1 stick of butter
2 T. of strong, brewed coffee (Is there any other kind, really?)
6-7 oz. of bittersweet or semi-sweet baking chocolate or a combination
2 T. cocoa powder
1/2 c. granulated sugar
1/2 c. brown sugar
1 tsp. vanilla
3 large eggs
3/4 c. all-purpose flour
1/4 tsp. salt
Preheat oven to 350, grease a piece of parchment paper (or foil) to line an 8x8 baking pan.

Melt butter and chocolate in a small saucepan, add cocoa powder, sugar, brown sugar and vanilla. Continue stirring over low heat until sugar mostly dissolved. Remove from heat.
Lightly beat 3 eggs in a separate small bowl or cup, slowly add about a cup of the hot chocolate mixture into the eggs stirring constantly, then add eggs back into the saucepan, still stirring. (This is called tempering the eggs and it's a really important step, nobody likes scrambled egg curls in their brownies.) Add salt then whisk in flour a little at a time until smooth. If you want nuts or chocolate chips, stir them in now.
Pour a bit of batter onto the parchment (helps weigh it down while you fold corners like wrapping a package so that you'll end up with a nice square edge). Add the rest of the batter. The good thing about baking with parchment is you can just lift the whole pan of brownies out and onto a cutting board after they cool. It would be great for cakes and things too!

I used foil because I'm out of parchment, but parchment is best.
Bake 15-20 minutes, until a toothpick or fork comes out with crumbs stuck to it. If the stick comes out clean, then they are overdone.
Delightful, delectable, brownies of my dreams...I think I'll have one now.

Sunday, January 15, 2012
Sunday Morning Goodness
I love restful Sunday mornings before church. No TV, no loud music, just family hanging around in the kitchen or living room, maybe reading books or playing with Baby P and talking. I like to make something yummy for breakfast, not always elaborate, just something out of the ordinary.
This morning I had a yen for Eggs Benedict. ("I'm up to my ears in yens." Rory, Gilmore Girls Season 1) The real kind with poached eggs-something I had heretofore never attempted and real hollandaise-something I am totally wild about.


This morning I had a yen for Eggs Benedict. ("I'm up to my ears in yens." Rory, Gilmore Girls Season 1) The real kind with poached eggs-something I had heretofore never attempted and real hollandaise-something I am totally wild about.

Let me just tell you, this breakfast was to die for and it only took about 15 minutes. No joke, the sauce is the most time consuming part and it is not bad at all! I used Julia Child's recipes for the hollandaise and the eggs. I always thought these two things were tricky, and I guess if you compare them to rice or frozen pizza, they could be considered tricky. Even so, I have not had a flop batch of sauce when following Julia's detailed instructions, and it is sooo, sooo tasty! Creamy, buttery and tangy all in one.
Hollandaise Tips: If you melt the first, large amount of butter in the microwave, you can do the sauce in one pan. (This is a small thing but it means a lot to me, I'd rather throw a small bowl in the dish washer than handwash two saucepans.) Definitely get the white pepper, it has a totally different taste than black that really compliments the creamy, butteriness. I use bottled lemon juice and I usually half Julia's recipe since there are just the three of us. I use two eggs instead of three and half the butter, it still turns out.
I do suggest halfing the recipe or you will be standing alone over the sink, eating hollandaise with a spoon because it is just too good to throw out.
This is all merely hypothetical, you understand.
Now for the poached eggs. I was very nervous about this, especially after seeing Julie and Julia where she screams and cries over poached eggs.
While it was reminiscent of chasing a jelly fish around a pan with a spoon, it just was not that bad. I brought the water to a "gentle boil", did the vinegar, used a spoon to make sure the yolk wasn't showing, boiled for 4 minutes and they were great!
They look like weird little alien eggs sitting here in the hot, salted water (as per Julia's instructions), but they tasted great and the yolk was soft but not too runny-I like a little texture difference between my sauce and my egg yolk).
I will live to poach again!

I did the sauce first and kept it warm. While the eggs were poaching, I toasted English muffins, sauteed a little frozen spinach in a tablespoon of butter then just had to throw it all together. (muffin, a little sauce, spinach, egg, sauce, a twist of fresh ground pepper)
It does my heart good to see my baby "Hoarking Down" forkfuls of Eggs Benedict. (Yes, that's a little Ratatouille reference.)


He loved it! A great Sunday morning

Wednesday, January 11, 2012
My Chicken Salad (or my attempt at Stanley J's Chicken Salad)
There's a little place in KY that I love called Stanley J's. It is a family owned deli that sells yummy sandwiches on Great Harvest bread, desserts, soups, dips, potato salads and the best, best chicken salad. It is simple, tasty, and no weird fruits or nuts.
The problem is, "There WAS a little place in KY that I LOVED...they USED TO MAKE the best, best chicken salad..."
Ahhhhh...so sad! Stanley J's closed in the fall and all they left me with were delightful memories...a vague list of ingredients from the container and my own observations of the chicken salad's physical appearance.
"Very finely shredded chicken (Maybe food processed?) chopped fresh
parsley, fine chopped celery, chopped green onions"
Ingredients
2-3 lbs of chicken (bone in breasts or whole chicken, with or without skin, if you buy a
large value pack, just cook all the chicken together and use it for
other recipes or soup)
2 stalks of celery (with leaves, etc..)
1 yellow onion, roughly chopped (with skin,etc...)
2 carrots, peeled and roughly chopped
1 T dried basil
1 T whole black peppercorns
1 tsp kosher salt
1 tsp dried dill
2 bay leaves
1 T dried tarragon
1 tsp sugar
1/2 c of homemade stock (strained)
good quality mayo (start with 3/4 c then more if needed)
1/4 c lemon juice
3 green onions, chopped
1 stalk of celery diced
1/2 tsp onion powder
1/2 tsp garlic powder
1T of fine chopped fresh parsley (just use 1/2 tsp of dried unless you already have fresh around for another recipe)
salt and pepper to taste
1) Cook the chicken. We are going to take this opportunity to add tons of flavor and make a whole big batch of chicken stock that you can use right away for soup or freeze for another time. In a large stock pot, bring about 5 quarts of water to a boil with the chicken and the first 11 ingredients on the list above. Throw in all the carrot peels, onion skin celery leaves, etc... Cover and simmer for about 2 hours. Remove from heat and allow to cool slightly.

2) Transfer the chicken to a cutting board (strain all that lovely stock and keep it for later, reserving about 1/2-3/4 c for use now), pull the meat off the bones and chop it finely. You should have about 4 cups.

3) Add the stock, mayo, lemon juice and 3-4 T of the diced celery to the chicken. Pulse in a food processor or use an immersion blender like I did (although this was a little challenging) until you get the consistency of a spread. Add more mayo and/or stock by the Tablespoon if needed.

4) Add the rest of the diced celery, the chopped green onions, parsley, onion and garlic powder and stir to mix. Add salt and pepper to taste. (I sometimes add another dash of lemon juice and even a tiny sprinkle of sugar at the end.)

It looks really simple but it packs a huge punch of flavor! Now all I need are thin slices of a summer ripe tomato from my garden and a couple pieces of Great Harvest Honey Whole Wheat to make it absolutely perfect.


Yummy, yum!!
The problem is, "There WAS a little place in KY that I LOVED...they USED TO MAKE the best, best chicken salad..."
Ahhhhh...so sad! Stanley J's closed in the fall and all they left me with were delightful memories...a vague list of ingredients from the container and my own observations of the chicken salad's physical appearance.
"Very finely shredded chicken (Maybe food processed?) chopped fresh
parsley, fine chopped celery, chopped green onions"
So! I set about recreating this delicious dish! Here it goes! (I'm not going to share it today, but whenever I make chicken salad I also make chicken noodle soup. It's crazy to waste that delicious broth and a lot of the ingredients overlap.)
Ingredients
2-3 lbs of chicken (bone in breasts or whole chicken, with or without skin, if you buy a
large value pack, just cook all the chicken together and use it for
other recipes or soup)
2 stalks of celery (with leaves, etc..)
1 yellow onion, roughly chopped (with skin,etc...)
2 carrots, peeled and roughly chopped
1 T dried basil
1 T whole black peppercorns
1 tsp kosher salt
1 tsp dried dill
2 bay leaves
1 T dried tarragon
1 tsp sugar
1/2 c of homemade stock (strained)
good quality mayo (start with 3/4 c then more if needed)
1/4 c lemon juice
3 green onions, chopped
1 stalk of celery diced
1/2 tsp onion powder
1/2 tsp garlic powder
1T of fine chopped fresh parsley (just use 1/2 tsp of dried unless you already have fresh around for another recipe)
salt and pepper to taste
1) Cook the chicken. We are going to take this opportunity to add tons of flavor and make a whole big batch of chicken stock that you can use right away for soup or freeze for another time. In a large stock pot, bring about 5 quarts of water to a boil with the chicken and the first 11 ingredients on the list above. Throw in all the carrot peels, onion skin celery leaves, etc... Cover and simmer for about 2 hours. Remove from heat and allow to cool slightly.

2) Transfer the chicken to a cutting board (strain all that lovely stock and keep it for later, reserving about 1/2-3/4 c for use now), pull the meat off the bones and chop it finely. You should have about 4 cups.

3) Add the stock, mayo, lemon juice and 3-4 T of the diced celery to the chicken. Pulse in a food processor or use an immersion blender like I did (although this was a little challenging) until you get the consistency of a spread. Add more mayo and/or stock by the Tablespoon if needed.

4) Add the rest of the diced celery, the chopped green onions, parsley, onion and garlic powder and stir to mix. Add salt and pepper to taste. (I sometimes add another dash of lemon juice and even a tiny sprinkle of sugar at the end.)

It looks really simple but it packs a huge punch of flavor! Now all I need are thin slices of a summer ripe tomato from my garden and a couple pieces of Great Harvest Honey Whole Wheat to make it absolutely perfect.


Yummy, yum!!
Monday, January 2, 2012
Happy New Year and Mexican Style Hoppin' John
It's been a year full of big changes for our little family, but it's been so obvious through all of them that home is truly where your family is and our hope and peace and security are not dependent on our circumstances or location. We miss our other family and dear friends so, so much, but now it's 2012 and we will be heading back to KY in just a few short months!
Last year at New Years we were at the lake with our friends the H's. Baby P was little bitty!


We got to visit with the H's a little bit when we were in KY, look at these two boys this year!

It's hard to believe they're so big and running around wreaking havoc!
We have a New Year's tradition that my Mom started years ago, we make Hoppin' John for 'good luck'. I usually make the traditional version, which we all love, but yesterday morning I woke up with the wild idea to invent a Mexican version. Here it is! I called it Mexican style because there are carrots and celery in there too, not sure that is authentically Mexican, but there is enough spice to warm you up on a cold winter day!
Just a disclaimer, this recipe makes a ton! So, have a bunch of friends over or get your freezer bags ready. It freezes really, really well and is super yummy! You could use your leftovers as a soup or chili starter or make burritos with flour tortillas and all the fixin's.
Mexican Style Hoppin' John with Chicken

Ingredients:
1 package of boneless, skinless chicken thighs (2-3 lbs.this is up to you, I didn't use very much
because the beans are so filling, I used thighs because they hold up a little better and are more
fatty/flavorful than chicken breasts)
1 lb. dried black eyed peas (sorted, rinsed and drained)
vegetable oil, butter
6 cups of chicken stock (you can buy this but I prefer the flavor of stock made with chicken base like
Minor's or even homemade if you have it on hand)
2 limes
1/2 bunch fresh cilantro (chopped)
1 large yellow onion, diced
2 poblano peppers, seeded and diced
2 stalks of celery, chopped
2 large carrots, peeled, chopped
4 T minced garlic
2 cans mild mexican style tomatoes (rotel, with or without green chiles)
2 small cans of chopped green chiles
Cooked white rice
Spices
-Emeril's Essence (original)
-Cumin
-Paprika
-Coriander
-salt
-black pepper
-cayenne
Optional (Guacamole or avocado, tortilla chips, ice cold beer)
1) Peel and chop all your vegetables, melt 2 T of butter and one T of oil in a large skillet. Saute onions until transparent, add other vegetables and garlic, cover and cook on medium heat about 5 minutes. Add half of the chicken stock to the vegetables and bring to a boil. Pour entire mixture into a large slow cooker. Add canned vegetables to the slow cooker as well. (Keep the skillet to prepare chicken)


2) In a collander, rinse and sort black eyed peas then add them to the broth and vegetables in the slow cooker. Sort just means look for anything that is NOT a black eyed pea, I have sometimes found (in cheaper bags, this one was perfect) small rocks or other types of beans, etc...


3) In skillet over medium high heat, add another T or two of oil and the chicken thighs. Sprinkle chicken (both sides) with a little black pepper, Emeril's, cumin, and coriander. Cook chicken 3 or 4 minutes on each side and transfer to the slow cooker. In the same skillet, bring remaining chicken stock to a boil (you don't want to lose an ounce of flavor) and add that to the slow cooker as well.
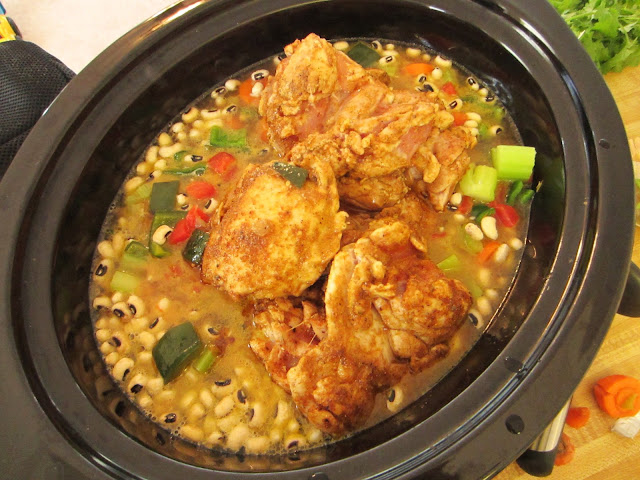
4) To the slow cooker, add a T of Emeril's, 1 tsp of kosher salt, a T of cumin, a tsp of paprika, and a tsp of coriander. Stir everything together and cook on high for 6-8 hours. (go easy on the salt because Emeril's and the chicken buillon contain salt, wait for pepper and cayenne until you can see how spicy the peppers and chiles turn out)
5) When peas and chicken are softened and cooked through (at least 6 hours), shred chicken, taste and adjust seasoning (salt, emeril's, cayenne, cumin). Stir in chopped cilantro (reserve a few tablespoons for sprinkling on individual portions) and squeeze in the juice of one lime. Cook on high for another 10 or 15 minutes.
6) Serve over rice with a dollop of guacamole, a sprinkle of cilantro, a wedge of lime and a tall, cold beer! It was delicious with the guac on top and a few tortilla chips on the side, I usually make my own but avocados are so expensive right now that I just bought a package of pre-made and it was really good.

Happy New Year! I hope it is wonderful, full of blessings and great memories and of course, 'good luck'!
Last year at New Years we were at the lake with our friends the H's. Baby P was little bitty!


We got to visit with the H's a little bit when we were in KY, look at these two boys this year!

It's hard to believe they're so big and running around wreaking havoc!
We have a New Year's tradition that my Mom started years ago, we make Hoppin' John for 'good luck'. I usually make the traditional version, which we all love, but yesterday morning I woke up with the wild idea to invent a Mexican version. Here it is! I called it Mexican style because there are carrots and celery in there too, not sure that is authentically Mexican, but there is enough spice to warm you up on a cold winter day!
Just a disclaimer, this recipe makes a ton! So, have a bunch of friends over or get your freezer bags ready. It freezes really, really well and is super yummy! You could use your leftovers as a soup or chili starter or make burritos with flour tortillas and all the fixin's.
Mexican Style Hoppin' John with Chicken

Ingredients:
1 package of boneless, skinless chicken thighs (2-3 lbs.this is up to you, I didn't use very much
because the beans are so filling, I used thighs because they hold up a little better and are more
fatty/flavorful than chicken breasts)
1 lb. dried black eyed peas (sorted, rinsed and drained)
vegetable oil, butter
6 cups of chicken stock (you can buy this but I prefer the flavor of stock made with chicken base like
Minor's or even homemade if you have it on hand)
2 limes
1/2 bunch fresh cilantro (chopped)
1 large yellow onion, diced
2 poblano peppers, seeded and diced
2 stalks of celery, chopped
2 large carrots, peeled, chopped
4 T minced garlic
2 cans mild mexican style tomatoes (rotel, with or without green chiles)
2 small cans of chopped green chiles
Cooked white rice
Spices
-Emeril's Essence (original)
-Cumin
-Paprika
-Coriander
-salt
-black pepper
-cayenne
Optional (Guacamole or avocado, tortilla chips, ice cold beer)
1) Peel and chop all your vegetables, melt 2 T of butter and one T of oil in a large skillet. Saute onions until transparent, add other vegetables and garlic, cover and cook on medium heat about 5 minutes. Add half of the chicken stock to the vegetables and bring to a boil. Pour entire mixture into a large slow cooker. Add canned vegetables to the slow cooker as well. (Keep the skillet to prepare chicken)


3) In skillet over medium high heat, add another T or two of oil and the chicken thighs. Sprinkle chicken (both sides) with a little black pepper, Emeril's, cumin, and coriander. Cook chicken 3 or 4 minutes on each side and transfer to the slow cooker. In the same skillet, bring remaining chicken stock to a boil (you don't want to lose an ounce of flavor) and add that to the slow cooker as well.

4) To the slow cooker, add a T of Emeril's, 1 tsp of kosher salt, a T of cumin, a tsp of paprika, and a tsp of coriander. Stir everything together and cook on high for 6-8 hours. (go easy on the salt because Emeril's and the chicken buillon contain salt, wait for pepper and cayenne until you can see how spicy the peppers and chiles turn out)
5) When peas and chicken are softened and cooked through (at least 6 hours), shred chicken, taste and adjust seasoning (salt, emeril's, cayenne, cumin). Stir in chopped cilantro (reserve a few tablespoons for sprinkling on individual portions) and squeeze in the juice of one lime. Cook on high for another 10 or 15 minutes.

Happy New Year! I hope it is wonderful, full of blessings and great memories and of course, 'good luck'!
Subscribe to:
Posts (Atom)